Long paring chisels are tools mainly used for cleaning up the mortises and joints and make them an accurate fit. Although this is an optional tool, it is very handy to have if you work with joinery, and here we will help you to choose the best paring chisel set for the money.
Table of Contents
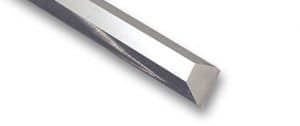
Paring chisel diagram and features
Paring chisel diagram
Paring chisels are long and thin tools which can outperform the widely used bevel chisel when longer reach is required. They are also used when fitting joints to carefully shave off thin amounts of wood.
The lightweightness and long length gives you a lot of control. Usually, one hand of a master pushes the chisel forward while the other one, guides the cutting action up front on the blade to dress the sides of a mortise after roughly chopping with a mortise chisel.
Paring chisel bevel angle
Paring chisels’ bevel angle is low, and this is probably the main feature of the tool. The lower the angle, the lower force you need to apply for cutting. This also means less of a need for a mallet and more control.
Bench chisels have 25° angle and Japanese ones about at 30-35 degrees, paring chisel are angled at 20° or less. The edge becomes very fragile but the cutting ability is superb. The wider the chisel, the more effort you need to push through wood, so the wider the tool, the more important a paring chisel angle is.
Of course, such a low angle requires tough steel. Thereby, the best paring chisels are made of carbon steel with a hand forged for better performance.
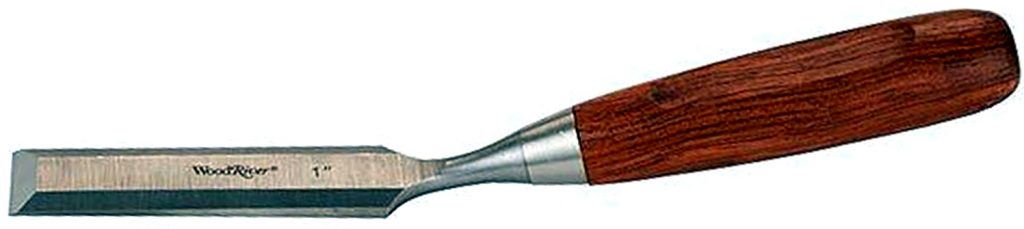
Buck Brothers paring chisels are an example of the tool with well forged blade made of good alloy steel with heat treatment. The handle is made of mape and is big enough for convenient use and, if necessary, modifying for your individual grip. The blades are 10″ long and advertised at 57-59Rc.
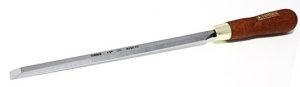
Cranked neck paring chisels
Cranked neck paring chisels are designed for cleaning out flat surfaces and other places, which cannot be reached by regular chisels. They are a valuable addition for any woodworker because of their ability to work in hard-to-reach areas.
The blades of cranked neck paring chisels are shorter (up to 4″) for maneuverability. The offset handle provide clearance for work in restricted recesses or fitting housed joints. It is also helps to see the blade face and reduce risk of digging in when making flush-trimming projections.
WoodRiver paring chisel has 18° cranked neck and permits keeping the blade flat while grasping the handle. Works good when you need to
remove excess glue, trim protruding plugs and cleaning out corners. Average length is approximately 10″, the sizes are 1/4″, 1/2″, 3/4″, 1″. Comes at cutting age angle 25 degrees from the factory
The chisel is fairly decent for the price. The steel is a bit softer, so you’ll have to hone it a bit more often, but it also is easier to sharpen. The handle is comfortable and the offset is exactly what you need.
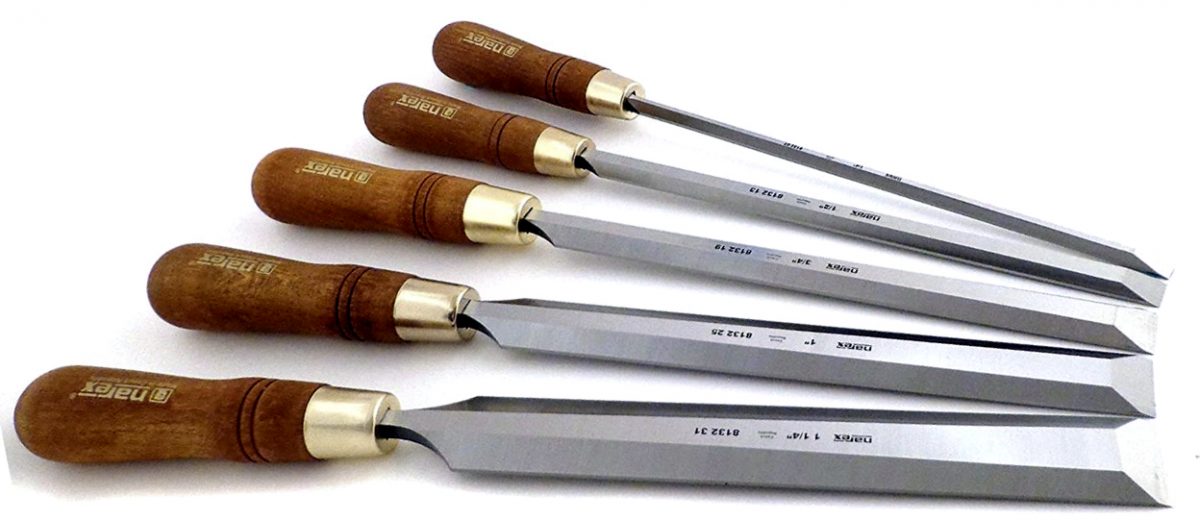
Best paring chisel set for the money in 2021
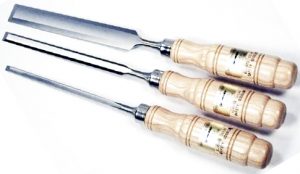
Narex paring chisels
Narex is a world renown Czech brand that produced tools for woodworking from 1919. More than 40% of the tools is exported worldwide. Narex paring chisels blade is made of highly alloyed CrMn steel and heat treated up to 59 HRc. The handles are ergonomic, made of hornbeam wood and come with brass ferrule.
Narex paring chisels – one of the best paring chisels set on the market – Check the price
Narex premium 5 piece set with hornbeam handles and 25 degree bevel is a great example of the best paring chisel set. The tools came in a cardboard box, each one is in a plastic sleeve and edge protector.
All of the blade lengths are 9 1/2″ long. The sizes include 1 1/4″, “1”, 3/4″, 1/2″ and 1/4″. The backs of the chisels are flat, the edges are not honed. You’ll need a normal progression of medium to fine stone sharpening and honing on a strop before use.
Overall, these are really great value for money tools and will last for a long time.
They work great right from the box, but some carpenters resharp them to 20° with a 25º secondary cutting bevel. And with this angle they pare off the wooden ends literally like butter. The steel is great and chisels hold up the cutting edge much better than average.
Paring chisel vs bench chisel
Both bench and paring chisels may be long, but bench chisel is designed for workbench use. You can use it for paring and light chopping. 30º bevels and beveled edges make cutting by hand harder, but and an impact-resistant handle eliminates this drawback.
The blade is typically medium length with either bevelled or straight edges. The handle may be a tang- or socket-style. Overall, bench chisels are versatile general-purpose tools.
Paring chisel is thinner and it is not designed for striking, only paring. The bevel is in a range of 20-25 degree, usually with tang handles. The tool is designed to be pushed across a wood surface to remove small amounts of material when finishing or neatening up joints.
As a conclusion, if you are beginner, buy bench chisel first, it is a most common and versatile tool. Rather, the paring chisel is designed for finer work, paring and shaving the workpiece, cleaning up deep mortises and joints.
The question about best screwdriver bit set comes to most of masters after killing a few screws due to the use of too-soft and low-quality bits. Of course, everyone likes to avoid that. It’s not a lot of fun to rectify. Screwdriver bits are an essential part of your toolkit and we’ll help you to find best screwdriver drill bit set for your projects.
Table of Contents
Common types and best drill screwdriver bit set in each category
With the screwdriver bits set you are covered for a lot of projects. And although modern tools are designed to ensure durability, you can’t expect any tool to last forever. Of course, you want to find best drill screwdriver bits capable of work with high torque and resist wear as long as possible, and we’ll help.
Common screwdriver bits designs
Before choosing the best drill screwdriver bit set, it’s a good idea to decide which type you need.
All the bits have 1/4″ hex shank, and fit into a drill with any chuck, including hex drive.
Insert bits have the shortest shank, they are the cheapest and are designed to easily clip into a magnetic bit holder.
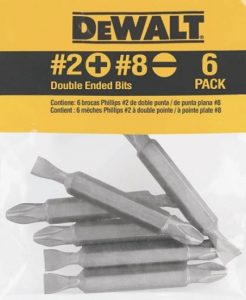
DeWalt is moderately priced company that makes relatively inexpensive bits that are good for most applications. I remember watching my friend go through like 8 different Philips bits while we built a porch together. And I started the word with a deWalt bit and at the end of the day the same bit still were in acceptable condition. So my choice is obvious.
Power bits are convenient to use with a power drill, they are of longer length and cost are a little higher.
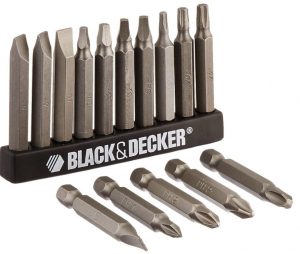
Black & Decker bits are another great example of ideal starter bit set. Pretty good quality and more than enough sizes for home use. Highly recommended, especially for the price!
Double ended bits have a screwdriver tip on each end and potentially give the bit a second life at less than double the cost. But they won’t fit into a 1/4″ hex drive chuck.
You can also find the bits with the hardened tip which is pressed into the hex shaft. The others have the hex bit that “curves” down to the needed square tip. Personally I’ve found the bits with the hardened tip lasting much longer than the others.
Most common tip types
Phillips bits are the most common type and for the most popular type of a screw. The bits look like a cross, and come in a range of sizes – #000, #00, #0, #1, #2, #3 and #4. The most common is #2.
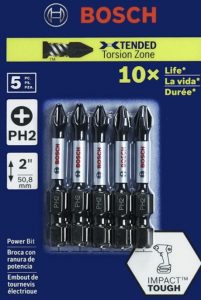
My choice here is Bosch power bits. They are hard, seem very well tempered, fit the slots very well and don’t slip at all. They even grip on the cheap screws. With this bits I’ve made with hundreds of screws on one bit! Bosch screwdriver bits are adequately priced and good enough for a home run.
Pozidrive Bits are an improved Phillips bits with an additional contact points. They decrease the possibility the bit will cam-out and allow to apply greater torque and decreases wear. Main sizes are #1 – #3 and #2 the most common too.
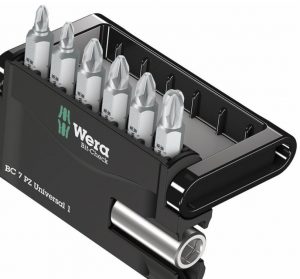
You certainly use them when working Ikea furniture and with Wera bits you’ll avoid the using the wrong type of bit to assemble products. This particular set comes with a magnetic bit holder, the plastic case is handy and reliable.
Slotted head screws now are less common, but screwdriver tips are still available. They are not convenient for a power tool as the bit tends to slip out of the head.
Irwin slotted head bits are a little overpriced but I have used them and have been very pleased. They are hollow ground and thin enough to fit into slot head screws nicely. The bits are tough and hard and with occasional use will last almost forever.
Torx Bits have a form of a 6-sided star and resist cam-out much better than previously described bits, and were designed mainly for automatic screw driving machines. Sizes vary from T1 through to T20.
DeWalt are great, they’re under $10.00 priced and just get the job done. Both a bit driver cordless drill with adapter – no issues with quality like others. There are not breakage of the bits, and stripping of drive head. Performs well and fit good. The only drawback is the difficulty in removing the tool from the bit holder.
You can also meet other types such as square recess bits, nutsetters, drywall bits, torq bits, tri-Wing Bits, etc, but they are less common
Best screwdriver bits in the world
Honestly I don’t see what the problem is. I have about 20 sets of screwdriver bits and it is the tool that I almost can not pass up when it goes on sale. Over the years I’ve combined the best and most useful screwdriver bits in my own best in the world screwdrivers bit set. I should admit, about 75% of them are deWalts. In my practice the deWalts usually fit like a glove and almost never strip.
Even with the best screwdriver bits in the world you have to match right bit to the screw and that means to use a pozidrive bit for a pozidrive head screw and of course a tapered square bit for a Robertson. Nothing will save the bit and screw from premature failure if the head does not match the bit.
Should I buy miter saw or circular saw? That is a frequent question for both beginners and experienced craftsmen, when they decide to create own workshop but can’t purchase all the necessary tools at once. For the novice master the best way is to borrow and try both. But if you read our miter saw vs circular saw comparison, it’ll definitely help you to make a good investment.
Table of Contents
Difference Between Miter Saw vs Circular Saw
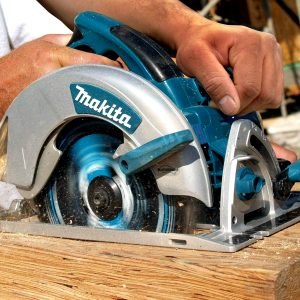
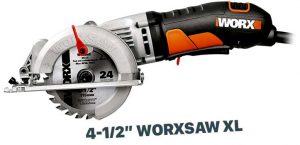
A circular saw is a mobile and universal tool for manual rip cutting – making a long cuts in the grain direction or shorter cross cutting against the grain. With the proper blades you can also work with plywood, MDF, panels, etc. The tool come in both cordless and corded models. It is relatively cheap and you can often find circular saw in workshops and garages.
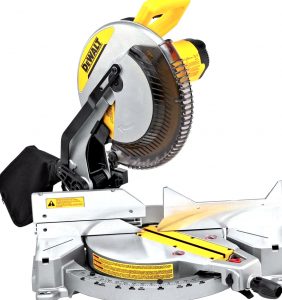
As you can see from the picture, circular saw is handheld power tool. It is relatively compact and mobile, but in order to keep the long cut straight or maintain an angle, you need to use special track or clamp down a straight edge guide.
Similar to circular saw, miter one use a flat circular blade to cut wood and other materials. But it also has special features to do accurate crosscuts. The tool can also cut bevel and “miters” – cuts at any angle other than 90°. Therefore, miter saw is a machine designed to make precise angled cuts quick and easy.
A miter saw is a more specialized machine for making several types of cuts. And it is more expensive
Technically speaking, the difference between a circular saw and a miter saw is in the miter guide frame. It allows you to make more complex and clean cuts, but as a result, the tool becomes more bulky and expensive.
Let’s Proceed to the Comparison: Miter Saw Versus Circular Saw
Circular Saw Pros
Circular Saw Cons
It is a handheld tool, you can cut in a variety of angles and cuts – it is one of the most convenient workshop machines
You need to be careful, follow strict safety guidelines to avoid accidents
Convenient to make both long and short cuts.
The accuracy is average
More lightweight and inexpensive. The price can range from $40 to a compact one to $100 for a bigger tool.
More prone to produce tear-outs and fragmented edges due to the its toothed blade. Fine-tooth blades help a lot, but miter saw is better for trimming tasks.
Usually provide various blade adjustments to perform almost any cut type.
Working with circular saw is more difficult. More physical effort and attention is required for a quality cut
With angles and stops adjustment it can provide accuracy sufficient for most tasks.
A circular saw is your solution if you want compactness and portability – and at an affordable price
Miter Saw Pros
Miter Saw Cons
Cuts are more precise
Not so versatile. It does only few types of (but very good) cuts but no more than that.
You can work quicker when making a lot of similar cuts
Occupies a lot of space and requires even more to work with long workpieces.
Convenient for stationary use and more expensive
Costs several times of the circular saw price – $200 to $600. But you could buy in used condition on ebay or at estate sales.
More safe to use, the blade only moves in an up/down direction within the adjustable range.
It’s a stationary device and you have to carry the material to the saw. Compact miter saw can be packed up into a car, but the circular saw can fit in most duffle bag.
Easily cuts cross cuts, bevels and miters
To extend the saw you need clamps and additional fencing to achieve stability.
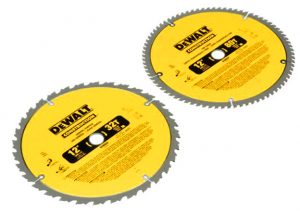
The Difference in Blades
The miter saw blade vs circular saw blade are similar in design. But usually circular and miter spin in different directions, therefore blades also have different directions pointed teeth.
Miter saw blade vs circular saw blade are similar – just flip it to set a proper rotation direction
Both fit perfectly, however if you install them label up, the teeth will face the wrong way. The good news is that it is perfectly safe to just flip the blade over and use it perfectly safe 🙂 There are no differences between circular saw blade vs miter saw blade, what side the label is on means nothing. As long as the teeth pointed in the correct direction, the saw will work fine.
Note that purchasing and installing the correct size and type of blade on both circular and miter saw is important to your safety and performance.
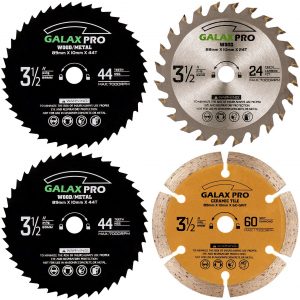
For cutting hardwood and getting a nice clean edges try fine-toothed blades. They have a lot of smaller teeth, so they’ll cut easily through the tough material and with a nice edge on the cut. Note that these blades usually require more power.
Fine-toothed blades are good for hard materials and fine cuts, coarse – for quick and rough cutting. You also can find diamond blades to cut tile and stone – choose what you need
The type of cuts and blade types:
Very coarse cut: fast cross cuts and rip cuts in hardwood, softwood and raw chipboards
Coarse cut: the sampe plus formwork, boards and plywood
Fine cut: the same plus parquet, chipboards laminated on one side and wood core plywood
Very fine cut: the same plus MDF and fibre materials
How to Choose Right Blades For the Tool
Choosing the correct tooth type for miter saw will have the biggest impact on the material. The high teeth number and the thinness of the blade help to make accurate cuts in laminates and parquet.
Another factor to take in mind is the shape of the tooth. Some blades have alternate top tooth bevel. One tooth slopes one direction, and the next slopes in another. These teeth are designed for fast cuts, perhaps through rough wood.
When choosing blades, remember that all the work is done with blade teeth. Small and fine teeth also need more power
When choosing circular saw blades, be sure, what blade height is correct for your machine. The disk part of the blade is there to support the teeth and set correct cutting speed. Therefore, setting right blade will help to get the most from the blade and doesn’t put your saw under too much stress.
If the teeth of your blade just protrude from the cut about a couple of millimetres, they will be making good contact with cutting material at the correct angle. The tool will work at the best speed with less vibration and resistance.
Conclusions
If you are a beginner, my advice is to buy a circular saw first since it is the most versatile power saw you get. Use it for few projects, and either keep it, or sell it on craigslist. Yes, it’ll cost you $20-30 on it, but you saved some money by working yourself. The circular saw is pretty compact, so you can store it anywhere for occasional use. And it’s versatile enough to build a kitchen full of closets or wall of bookcases.
When your skills will become enough for more complex projects, buy a miter saw to take advantages of both devices. Use circular saw for rip-cuts and miter for precise trimming. Professional carpenters use their miter saw almost daily. It is the best pick the work involve making miters for cabinets and moldings.
Any nail technician spends a lot of working time removing acrylics or gels enhancements. Using electric nail machine makes work easier, faster and also allows you to quickly backfill, shape and clean the nails with a special drill bits. Using high-quality nail drill can save you a lot of time and efforts. The device is not that expensive, so any technician will tell that you should find the best nail drill, either you are a beginner or a professional. Higher cost of the good device may pay off in several procedures.
We’ve consulted with many nail technicians and will explain here basics about nail drills. In addition, based on the experience of the nail masters, we reviewed the best products in the market and our recommendation for professionals are Kupa MANIPro passport nail drillas the best portable nail machine or full size3-in-one combo machine. For beginners and personal use we recommend AIRSEE Portable e-file.
Table of Contents
Main features of portable nail drill (e-file nail drill)
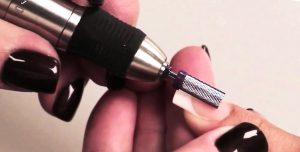
With electric nail machine you can handle nails, calluses and cuticles, they allow you to shape the nails and enhancement more precise and effective. With the device it’s so easy to achieve a quick and high quality results, that you’ll never go back to regular nail files.
Electric nail drills differ in size, capacity and rotation speed. Some of them are powerful enough only for natural nails, and others are designed to work with acrylics.
The speed is in a range between 10,000 RPM to 40,000 RPM. If the electrical, and therefore mechanical power is sufficient, then the higher the revolution per minute (RPM) number the more efficient the machine is.
Most of professional nail drills are 30 000 – 40 000 RPM corded or cordless electric machines that come with a foot pedal to allow hands-free operation. Almost all devices allow to to adjust the speed down based on the amount of filing.
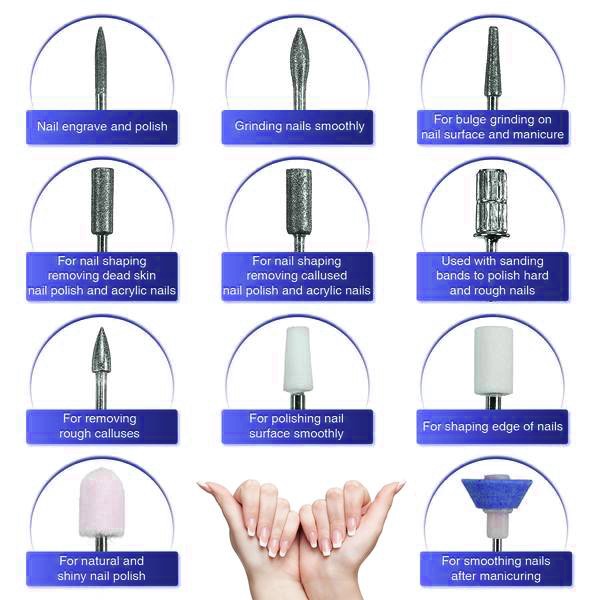
Nail drill bits guide – different nail drill bits and their uses
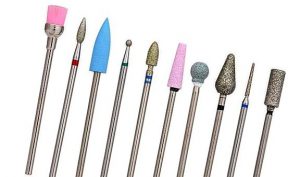
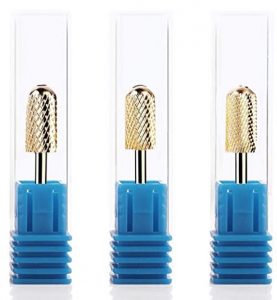
Usually the drill comes with starter kit – multiple drill bits that for the most part are 3/32″ size. The sharpness, effectiveness and durability of a nail drill bit is very important in your work so don’t use just any cheap low quality product. Usually cheap nail drills come with really rubbish bits and you shouldn’t use them at all! We’ll describe more about different nail drill bits and their uses below.
Most nail drill bits are 3/32” size and vary in shape, size, form and grits
The price and quality of nail drills vary, but we advise choosing really good tungsten carbide tools from a good brand such as ProTool USA or ToDac USA. They have superior strength, durability and sharpness, work with minimal friction and heat generation. The service life of such a bit is measured by years of practice, so $10-20 for a bit is not that expensive.
Best nail drill bits types
Diamond nail bits
Diamond bits are made of synthetic diamond crystal on metal base, and they are the hardest tool available. Another advantage is that diamond tools don’t rust after disinfection and water cleaning.
Most of cuticle drill bits are made of diamond. They also are able to scratching hard build-up material off, but create a lot of dust, friction and heat.
Carbide nail drill bits
Carbide is the hardest (but brittle) of the drill bit metal alloys. They are designed for the most hardest and demanding materials. They are very long-lasting and usually have flute-like cuts on cutting head. This form helps to shave the enhancement material off. Carbide tools don’t scratch the nail like the diamond ones and work with less heat build-up. The bits can be cleaned and disinfected without restrictions.
The dipper and larger flutes are, the more coarse grit is. Finer bits come with shallower flutes. Carbide nail drill bits are a great tool for advanced technicians and are the best tool for removing acrylics.
Ceramic bits
Ceramic is hard-wearing, sharp and durable material. It’s main advantage is an excellent heat dissipation, the tool won’t be burning hot in long-time use like metal bit. Universal 3/32″ steel shank suits for most electric nail drills.
You can buy ceramic bits in different shapes and sizes, coarse and fine, large and small, etc. The material is corrosion resistant, as well as no clogging for nails. The surface is easy to clean with water.
Nail drill bit uses
You can use your nail bits to remove nail enhancements quick and easy, for filing or shaping nails.
Cone carbide bits which are excellent for getting in those hard to reach areas; backfill carbide bits which were specifically designed for doing backfills on pink and white nail services; under nail cleaner carbide bits, which allows you to easily and quickly
Getting a high quality tungsten bit helps to do you word quickly and more efficiently use the power of your nail drill for removing gel and acrylic nails.
But there are many nail drill bit types and you may be don’t want to by all of them and try each. So, the question is, which type of nail bits would be able to remove acrylic and gel nails the fastest/easiest?
I highly recommend the ceramic smooth top and cuticle drill bit, but usually they are not to be used on the natural nail.
Let’s look at the use of nail drills with an example of Safety Nail Drill Bit Set. The set consists of 3/32″ bits made of metal with tungsten carbide. The are durable and wear-resistant and has the most universal and safe form – a barrel with smooth top.
The shape of the bits make them beginner friendly. The top is smooth and you don’t hurt the tips of the fingers when using them. The bits are easy to use, they are extremely effective when smoothing out and shaping the nails after acrylic application and work very gentle around cuticles.
The bits are suitable for gel nails: nail polish, dip powder, nail extension gel. They are also suitable for left-handed.
There are three grits bits in the set:
“F” – Fine Barrel Bit. If you are removing gel polish on the natural nail, then take this lower grit nail bit and lightly drill the gel polish away. Don’t polish actual nails too much or you’ll damage them and they’ll become thin and brittle.
“C” – Coarse Barrel Bit. If you are working with a thick gel polish on acrylic nails, then use the “C” grit file to remove away most polish and acrylic.
“M” – Medium Barrel Bit – use when you are if you are getting close to the nail or base acrylic layer that you don’t want to remove
Using a low-speed operation and gentle handling is helps the bit to get clean during work. You can also easily clean the bits by soaking it in acetone, and then brushing it with a cleaning brush.
Best nail drills 2021
Best nail drill for beginners
You should understand, that using electric file needs caution. It can be dangerous for you and your patient. The best way is to wait until you’re confident and experienced with manual application and removal before you use nail drill. After it, if you want to be nail technician, get some training. The course is usually inexpensive and only takes one day.You will be more confident that you will not burn the patient or damage the nail.
And be careful even if it’s for removing your own gel nails because it’s more difficult to control handpiece with your non-dominant hand.
Best nail machine for beginners can’t be the cheapest one. Many of nail technicians initially purchase a budget drill but it is a waste of money. You should feel confident and in control using the your electric file. No name low quality devices have a lot of vibration and the client will also feel this.
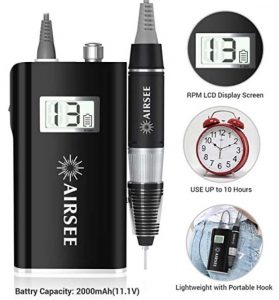
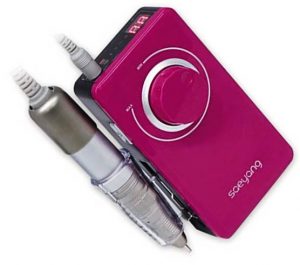
AIRSEE Rechargeable 30000RPM Electric Nail Drill
Acrylic nail drill (about $70) for occasional home use – Check the price
AIRSEE Portable file is a compact device for common 3/32” shank drill bits and 20 000 RPM. This is an ultra-cheap option for 20% of the Kupa cost. And of course, you cannot expect the same level of reliability and performance.
You can buy the handpiece of both nail drill models alone and they come with six months free replacement warranty.
Conclusions
The advantage is that if you are a beginner master or a nail tech student, you can buy the device for only a fraction of the MANIPro price. This file is not so reliable, but it’s portable and powerful. The LCD screen is informative and convenient. And unlimited 6-month warranty gives you confidence that you will have enough time to decide how successful you are in the profession and whether you are ready to invest in expensive professional equipment
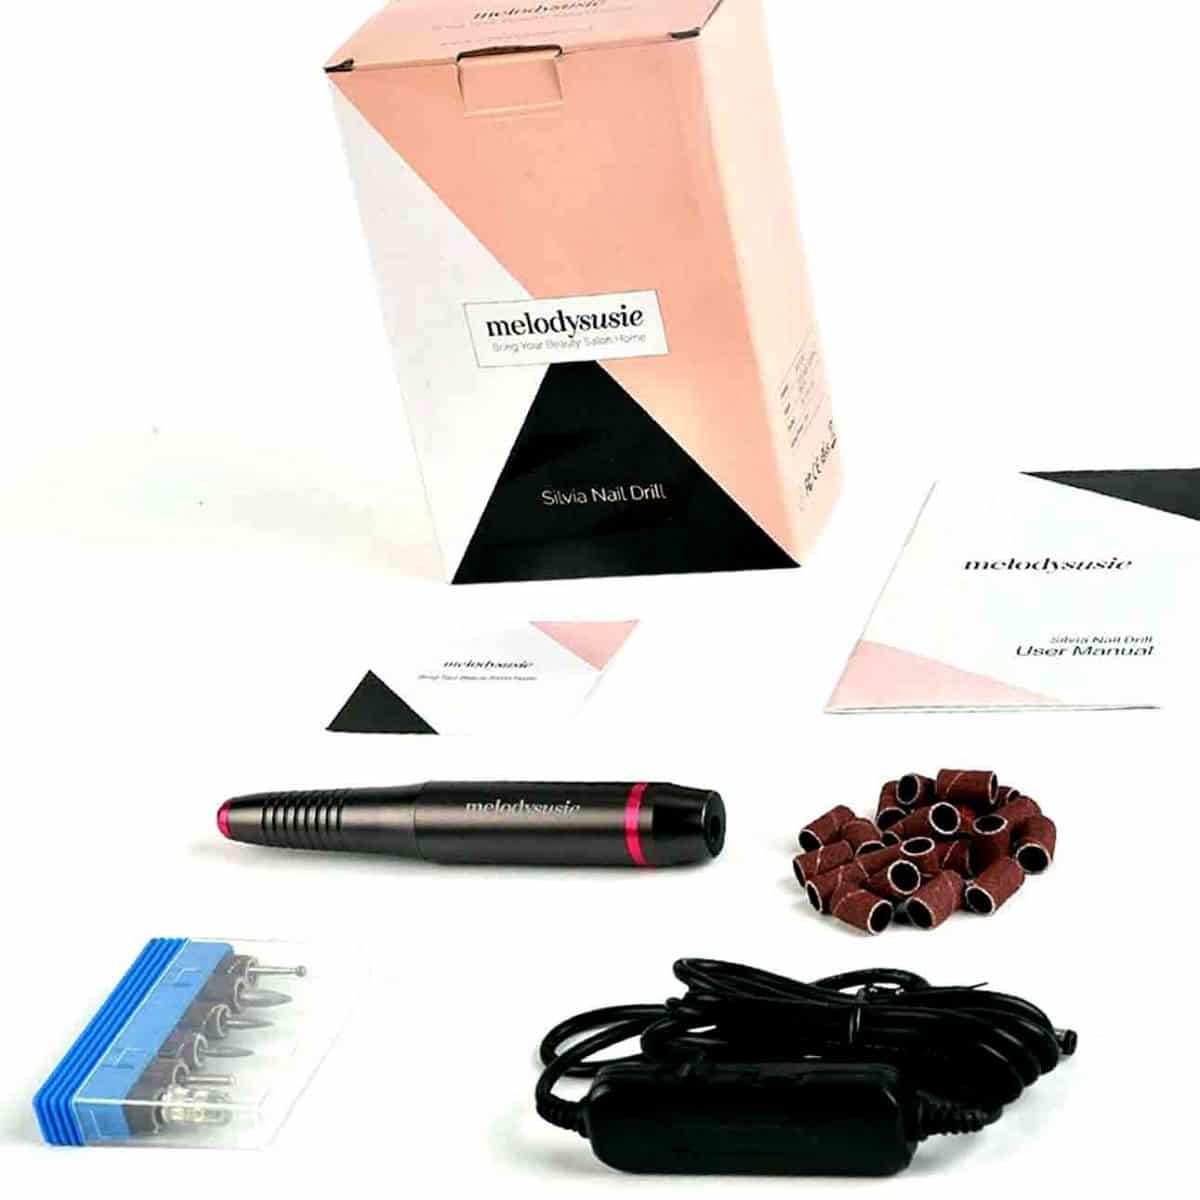
MelodySusie Electric Nail Drill USB Type
MelodySusie Electric Nail Drill USB Type for emergency home correction – check the price
This 3/32” shank compact nail drill work from USB socket including: power banks, AC adapters, car chargers.
The device comes with six kinds of metal bits and 26 sanding bands. The speed control is performed with an adjustable button, the maximum set is 20,000 RPM. The handle is pretty compact, lightweight and easy to handle.
But despite the advertisements, this machine is not designed for salon use. It lacks power and low speed reduces productivity.
Nevertheless, any woman faced the problem of a damaged nail, which urgently needs to be corrected and polished, and there is no time to visit the salon. For this case, it is worth spending about $20 to have a simple “rescue” device on the shelf.
Best professional nail drill machine 2021
Professional nail drills are powerful devices that can work for a long time without stopping. The reliability of such devices is sufficient to withstand an operating mode of 8 hours a day and 7 days a week for many years, usually 10+. With them, you most likely will not have problems with engine overheating, insufficient power, increased drill vibration and other things. Nonetheless, the best professional professional nail drill machine will be quite bulky even in 2021. These are table drills, you can’t just put them in your bag and go make gel nails for your sister.
The higher cost will quite quickly pay off if you work in the beauty center. For private use, or if you are not sure about the flow of customers, it is better to choose the compact and much cheaper “starter” model. If your business will grow, you can always buy a truly productive professional model.
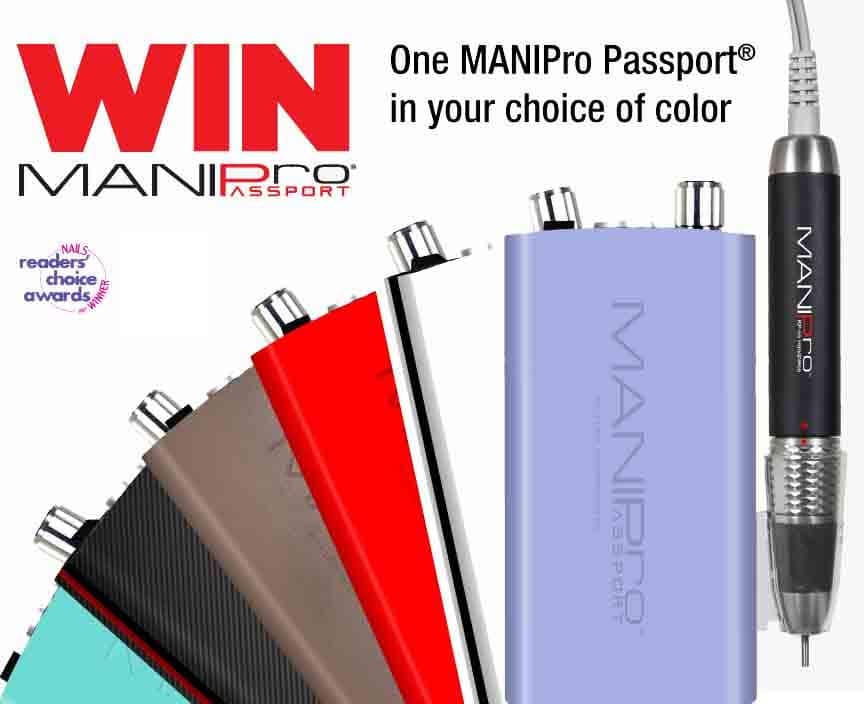
Kupa Mani Pro Passport nail drill (nail file)
Kupa Mani Pro is a fairly well-known brand among manicurists. The Passport series machines are wireless, which limits long-term operation under heavy load. Nevertheless, this series of nail drills provide a high level of quality and reliability. Service support is also one of the best among the competitors.
Kupa MANIPro passport nail drill – the best PORTABLE nail drill for beginners and professionals – check Amazon price
The control block comes in red, purple or white acetone resistant finish and powers the engine for 8-10 hours of work.
You can buy Kupa MANIPro Passport machine with or without handpiece. The handpiece costs about 70% of the total price. It’s manufactured from stainless steel and features a smaller nose and rubber grip. The weight is 5.6 oz. The unit comes with strain relief cord and is also compatible with older versions: KP-5000, UP-200, UP200-V and Upower 2-G.
Conclusion
Kupa Mani Pro Passport nail drill is a portable machine with good speed and power. It’s good for beginner but it’s a little pricey. The quality is OK, but on high speed the drill bit tend to get loose when you shorten the acrylic nail.
Marathon K38 Portable Wireless Nail Drill Machine
Marathon K38 is portable (67 x 128 x 30(mm) / 2.64 x 5.04 x 1.18″), and lightweight (140g) nail drill with digital speed display and on/off foot switch.
The engine is powerful enough, it has 30 000 RPM with high torque 1.9Ncm. The Li-Ion battery allows you to work for up to 8 hours with overload protection
Marathon k380 portable cordless electric nail file – Check on Amazon
The only unpleasant thing with the machine is that you have to change the battery in the control box when it can no longer hold charge. You although can work with the power cord. The battery lasts about 3 years and gradually loses capacity.
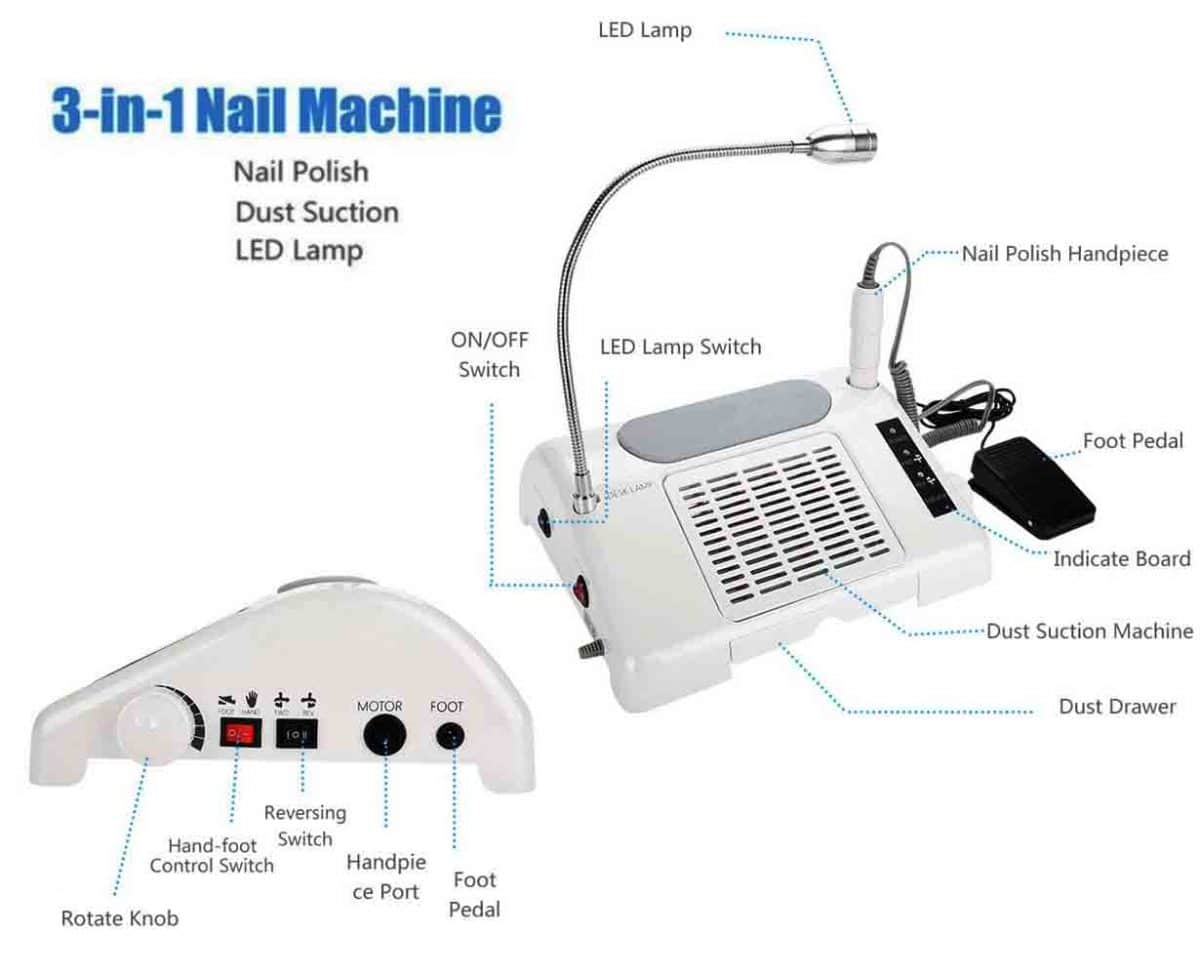
Professional nail drill with a dust collector and manicure desk Lamp
Best multifunctional professional nail drill – check on Amazon
The use of nail drills without personal protective equipment, is an occupational hazard to the healthcare technician (wiki). Nail dust on the skin can cause irritation and shavings of nail gel or acrylics can be inhaled. Moreover, the dust could be swallowed while drinking and eating.
Hence, dust suction devices are essential for the nail technician. So why do not use multifunctional nail drill with a dust collector?
Another feature of the professional machine is two-way control: hand regulator + foot pedal operation. You can choose what is more convenient for each procedure.
Nail drill motor works with 35 000 RPM maximum speed and it’s power is 65W – much more than portable devices usually have/
The device comes with the set of moderate quality nail drill of 6 different sizes for polishing and grinding work.
Conclusions
Electric files are not all the same. If you work with it for a long time, comfort and efficiency are very important.
Machine handpiece it should be light and powerful enough to file the length of nail and enhancement down without the file stopping. It must not vibrate too much when working, vibration distracts you and your client and degrades the quality of work. Low quality machines sometimes also don’t keep the drill bits straight and steady.
If you are nail technician, better to purchase professional and usually more expensive machine. Higher initial cost will pay off it in the long term. But for a beginner, the Airsee device may be enough and it is five times cheaper.
And remember, the safety is first. Before using a nail drill bit be sure you have enough experience. Practice with an usual file for same time. Then you can take one-day learning course about using nail machine. When you will decide you are comfortable enough with your e-file to work on the clients, I advice always ask new clients if they are OK with using the device on them. Some of them don’t like nail machines if they have been burnt or cut by one before.
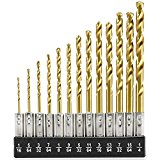
There are three basic types of wood drill bits. Wood drill bits are, obviously, used for drilling wood.
Special wood drill bits are required for larger holes to be cut with greater accuracy.
The first type of wood drill bit is a lip and spur bit, which are also known as dowel bits. These drill bits are like standard twist drills but have a singular sharp center point and two outer cutting spurs. Because they have the single center point, it provides for a precise placement and the spurs provide a very clean hole. The lip and spur bit is particularly useful in dowel work where a precision hole is necessary for an accurate fit. Lip and spur bits are available in sizes from 3 mm to 30 mm diameters but the larger sizes of drill bits are quite expensive. Smaller sized lip and spur drill bits often come with dowel kits and usually come with an adjustable collar so the hole depth can be determined more easily. They also often come with indexing inserts, which are inserted into the hole to give you a center for drilling.
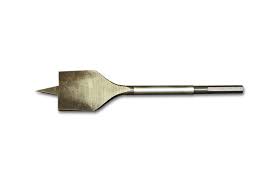
Another type of wood drill bit is a flat bit. Flat bits have a centre point but have a flat cutting edge and look similar to a spade. A sharp, flat bit will quickly cut a clean hole. These bits can be sharpened after use with a file. Flat bits are relatively inexpensive because of their uncomplicated construction. Flat bits are available in 6 mm to 38 mm sizes. A pumping action is required when using a flat bit to remove excess sawdust to help avoid their tendency to wander when drilling thick timbers. Some varieties of flat bits have a screw style thread instead of a center point to help pull the drill through the timber.
Auger bits are another type of wood drill bit that look like corkscrews. Auger bits have a wide chisel-like cutting edge which gets rid of the excess waste sawdust while you are working, and one outer spur which cuts into the wood in front of the cutting edge to produce a very clean hole. The deep coiled groove helps the waste sawdust to be removed quickly. Auger bits are usually slower drilling than flat bits, but thusly produce a cleaner hole in the wood. Because of the length of the corkscrew, the hole in the wood will be more precise. Auger bits are available in lengths of at least 100 mm up to 450 mm and in diameters of 4 mm to 30 mm. Auger bits can also be sharpened with a file.
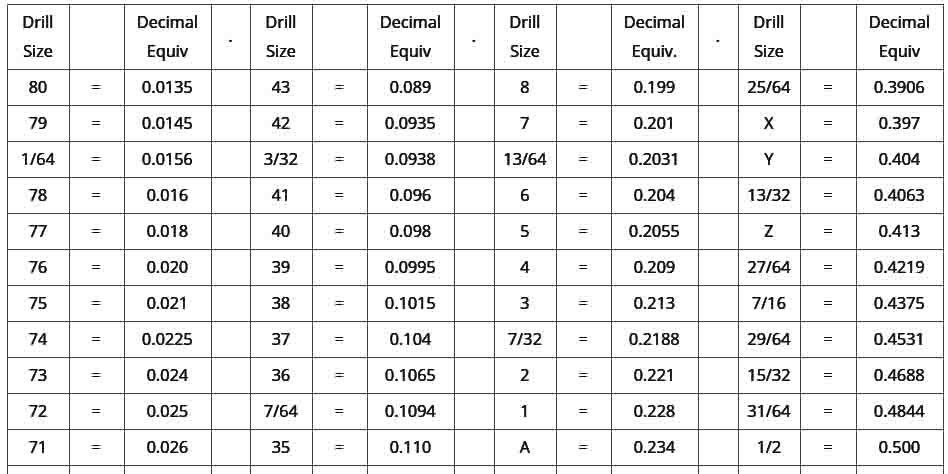
You can actually custom order a drill bit to any size, but most drill bits – the actual cutting part on the end of the drill – are manufactured to standard sizes.
In the United States, fractional inch sizes are still used; in most other parts of the world, metric bit sizes are normally used.
Because of the two common different measuring systems – fractional and metric – it can be a little confusing buying the right drill bit size. To confuse things even more, there are two other ways of measuring – letter sizes and wire-gauge sizes.
If you are purchasing drill bit sizes in the United States, the size will probably be measured in fractions. The standard “twist” drill bits, which most people use begin at 1/64 of an inch and continue in 1/64 increments up to 1 inch. One disadvantage of this method of bit sizing is that the size increment between drill bits is extremely large for the smaller sizes – a difference of 100% between the first two sizes.
Metric drill bit sizes were introduced by the British Standard in 1959. The British Standard BS 328 identifies bit sizes ranging from the smallest, 0.2mm, to the largest which measures 25mm.
Letter sizes for drill bits are perhaps the easiest to understand. These bits are used to make precise small hole sizes and are simply labeled from the smallest – A – to the largest – Z. Even the largest of these is a mere 0.4 inches in diameter, so you would use letter sizes for detailed and close up work.
Wire gauge sizes, as the name suggests are standard measurements used for drilling holes for particular diameters of wire, especially wires conducting electricity. Most of these sizes are extremely small – a size AWG 36, for example is just 0.005 inches in diameter.
Drill bits with a “twist” on the end are also sold in standard lengths as well as sizes – the length is in proportion to the diameter of the bit.
Unless you are an expert and need a particular size, it is probably best just to purchase a variety of drill bits of varying sizes, ensuring you always have one that’s the right size for the job.
Plastic drill bits were designed to deal with such materials as Plexiglas® and Acrylite® along with other plastics.
It’s entirely possible that by looking at the title of this article you may be inclined to think that a new drill bit has been developed using plastic as the primary component of construction. However, when referring to plastic drill bits we are actually referring to a drill bit specifically designed to bore through a variety of plastics while producing a smooth hole.
Many have mistakenly tried to use a standard wood bit to achieve this goal and wound up with cracks and jagged edges in their plastic (we’ll talk more about this later).
If you are using a plastic drill bit for the first time it is important to make sure that when you drill as a guide for an attaching screw that you make the hole size slightly larger than the screw to allow for any contractions in the plastic.
While a standard drill can be used to drill holes in plastic, a drill bit specifically for plastics may have best results when a drill press is used. The primary reason this is true has to do with the slow even pressure needed to achieve the smoothest desired result. If you do need to use a hand drill, be sure to ask which plastic drill bit may be best to use with this type of drill.
There are nearly 90 separate drill bits for applications involving plastic – all an inch or smaller.
Some experienced handy folk have found that regular wood drill bits can be used for this application, but require modification to the existing drill bit. Small flats must be ground on each side of the edges that will cut into the plastic. The speed of the drill must be reduced to supply gentle, continuous pressure to the plastic material.
If you’d rather purchase the plastic drill bit you need simply visit your favorite hardware store or shop online for the greatest variety and information.
If you have ever tried to drill holes in concrete using a regular drill and a high-speed steel drill bit, you know that it is a useless exercise. High-speed drill bits are perfect for drilling through wood, which is fibrous—the best way to make a hole in wood is to cut or slice your way through. The job goes faster with the sharper your drill bit is.
Regular twist drill bits are sharp at the tip as well as down the edges of their spiral flutes. Well made twist drill bits stay sharp for a long time; however, they become dull if they are exposed to hitting too many nails. Twist drill bits and regular drills can also make holes in metals, including steel. However, you can drill for a longer period if you use a drill bit made of material that is harder than high-speed steel, such as titanium or cobalt.
Drilling in concrete is a whole different ball of wax. Concrete is granular, where wood is fibrous and metals are generally smooth and monolithic. Concrete is made of grains of sand and chunks of gravel glued together with cement. Trying to drill through concrete with a regular drill bit or even a titanium or cobalt drill bit will dull the bit as fast as sandpaper. You cannot cut or slice concrete; you macerate it and pull apart the grains. When you clear away the powder of concrete, your hole is there.
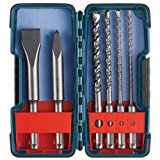
Masonry drill bits were invented to drill through concrete. Masonry drill bits are a wedge of carbide, which is only a little less tough than diamond, which is attached to a spiral shaft. The shaft is not intended to stay sharp, but rather to gather the resulting powder and pull it out of the hole. The shanks of masonry drill bits are smooth and either hex-shaped or rounded. They can be used in your regular drill to drill through concrete, albeit quite slowly. If you need to make larger holes in concrete, then masonry drill bits are not going to meet the grade. You will need a hammer drill or a rotary hammer to achieve larger holes in concrete.
Ask twenty do-it-yourselfers how important pre-drilling is, chances are you’ll get at least ten different answers.
So, is pre-drilling necessary or just an added step almost never needed? That depends on many factors.
You need to pre-drill if:
You are using green wood. If the piece of wood you are drilling is heavy for it’s size, it is likely green, or young, wood OR
You are using treated wood. Treated wood is usually used for outdoor structures or decks OR
You are using hardwood. Birch, cherry, mahogany, maple, oak, poplar, rosewood, teak and walnut are all hardwoods OR
Your final hole will be larger than 3/8” OR
The wood you are using has been stored in humidity greater than 20% for more than 24 hours before drilling OR
You want to pre-drill.
You do not need to pre-drill if:
You are using dry wood that has not been pressure or chemically treated AND
You are using softwood like pine, cedar or redwood AND
The final hole will be smaller than 3/8” AND
The wood has been stored in dry conditions for more than 24 hours AND
You don’t want to.
Pre-drilling Tips
If you don’t pre-drill treated or green wood, it will likely split when it dries.
Hardwood typically takes years to completely dry so you should always pre-drill hardwood, since it’s possible it still has drying to do.
Holes larger than 3/8” can put undo stress on wood. If you pre–drill these holes before inserting a screw or nail, most of the wood will be removed from the hole before nail or screw is inserted, reducing stress.
Always pre-drill with a bit slightly smaller than the final hole.
If the final hole will be 3/4” or larger, pre-drill in increments of 1/4?. Example: pre-drill with 1/4” bit, then 1/2? bit, then 5/8” or 11/16” bit.