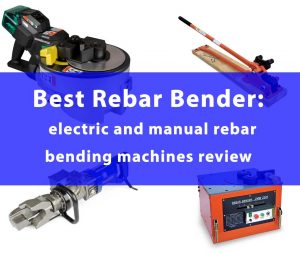
If you have a lot of custom bends and cuts, rebar bender is a GREAT tool. One of my project included bending about 500 braces with 2-3 bends each. I can’t imagine how I’d made this task so quick and accurate without my manual rebar bending machine. Since that time I have had many other bends, and it was so much easier with the tool than with a homemade jig.
Table of Contents
Best rebar bending tools
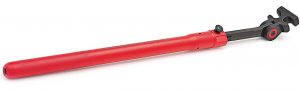
Manual rebar bender
I don’t really like open jaw manual rebar bender type, cast iron heads, feeded from either side are better. Anyway, maximum size of rebar to cut and bend with a manual tool is usually 5/8″ grade 60 rebar. You should consider that it’s hard and wont bend a full 90° without taking an extra “bite”.
BN Products manual bender and cutter has a long handle and a cam mechanism that with greater leverage. Comes mounted on 2″x8″x60″ wood base with adjustable 2-1/2″ bending roller, replaceable cutting jaws and a lifting ring with chain to make it easier to carry. It is heavy duty device. Even if you buy it for a single project, you can resale this any day of the week after your done with a little discount.
Crescent HK Porter 3/8″ and 1/2″ manual rebar bender is an improved “hickey bar” to bend No3 and No4 rebars. You can regulate the leverage from 21″ to 35″ with a pushbutton. The indexing head helps to grip rebar securely for more convenient work. You can also purchase single-sized No5 and No6 models.
The tool is tough and very versatile. It is able to pivot the head to make bends in tight places in a more convenient way. The extendable handle is an awesome design, allows to set the handle length just right and makes the tool easy to store. The bender provides way better leverage than the other designs available.
Electro- hydraulic rebar bender
In this section, we will discuss a combined electro-hydraulic rebar bender – a machine that uses a hydraulic plunger and an electrically driven oil pump.
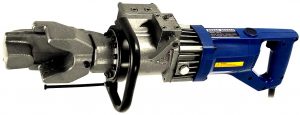
There are many tools of this type on the market and almost all of them have a similar design under different brands. One of the best of the hydraulic rebar benders is a Happybuy 800W
The unit comes with a low noise electric motor that is able to bend #5 grade 60 rebar within 5 seconds. Bending angle is set by adjustable positioning bolt to work with any angle up to 130°. The size and weight allows you to carry and operate the tool with two handles.
With the hydraulic rebar bender there is no need to pull the rebar out of the pit or use a leverage. Just measure and mark the bar and pull the trigger. The only downside is that this thing is hard to carry around. But, nevertheless, it is a fast, simple and efficient unit. The Hitachi tool we will discuss below has no hydraulics (so it’s simpler and more reliable) and has electronic angle adjustment, but it is much more expensive.
Electric rebar bender
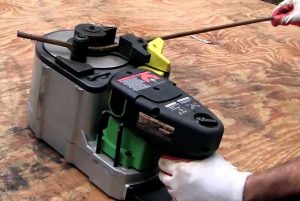
Hitachi VB16Y Rebar Cutter/Bender is one of the best portable electric rebar bending machine. And if you really need table bender, you may make table around it pretty easily. But now when we have a lot of bending and cutting to do, I work off of the trailer. Its deck height is a lon more convenient than working off the ground. From the trailer, I make the repetitive turns easier and more accurate.
VB16Y electric portable rebar bender comes with 530W motor and uniformly bends up to No.5 Grade 60 rebar up to 180 degrees angle. Cutting and bending is made in about 3.1s and 5.1 s respectively.
In my opinion, this portable rebar bender/cutter is a must have for any professional concrete installer. Nothing will beat portability and accuracy of this microprocessor controlled device. Of course, the bigger table top models are nice but at 200 or so pounds the manufacturers version of portable and ours are different.
Tips and tricks
Do not bend the reinforcing bar more than the specified diameter, primarily for reasons:
Too small bend diameter can cause damage to the bar which impairs the tensile strength of the bar. Tight bending frequently result in outright fracture and may also result in microscopic damage which is not evident.
Less than ACI/CRSI minimum diameter bends do not reliably perform in concrete. They can lead to excessive crushing of the concrete inside the bend and fracture of the bar.
The challenging part is getting the first little bit of the radius to actually be a radius.
The more the inner bend diameter, the less force you need. The difference between a 10″ and a 5″ diameters is about 100 tons.
Manual tools are good for 1/2″, but if you need to work with a lot of 5/8″, spend the extra money for the hydraulic rebar bender
Conclusions
If you are not professional and make a handful of simple right angles, buying bender not worth it. You always can make a jig or use a tube. An oxy-acetylene torch outfit is good to cut the rebar, and you can bend BIG rebar when you heat it up with the torch
For regular use my advice is to buy a BN manual bender for a couple hundred bucks, for professional use a Hitachi VB16Y for about $2000 is great. Serious daily bending needs a table top for about $3500.
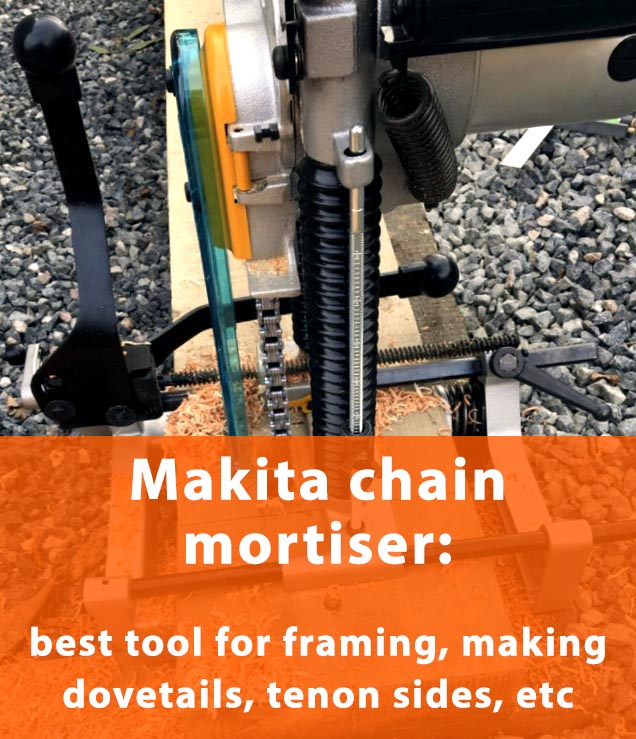
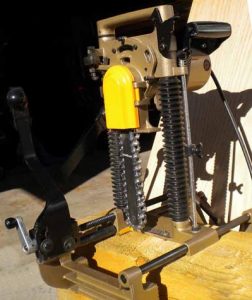
Chain mortiser is a unique tool helping you to do framing quick and effective. It saves more than enough time and efforts to justify its cost of use. Of course, you always can make frame mortises with chisel and drilling work, but your shoulder and wrist joints won’t thank you, especially when you are getting older. Nobody of my professional woodworkers regret buying the chain mortiser. They also use it any time that they need to hog out material – dovetails, sides of tenons, mortises, etc.
Table of Contents
Chain Mortiser: Why Do You Need It
Timber framing is very labor-intensive. And if you use only hand tools it gets just crazy. It you need to finish the barn before you get old, use power tools and don’t underestimate the labor involved. I have the Makita chain mortiser, and it’s brilliant and fast. The machine is easy to use and cuts very quick once you have got everything marked up. It’s also no problem to come in from both sides on larger pieces.
A chain mortiser can be a bit intimidating at first, but you’ll get used to it pretty quick. And although it isn’t often noted for accurate work, you can repeatedly and comfortably use the unit to within 1/8″ on your layout lines with the balance being finished with framing chisels.
Stationary chain mortisers are also widely used in the furniture industry. The horizontal slot mortiser is the best choice for a small shop to produce accurate and repeatable results, even with a novice operator. The low rpm is convenient for horizontal boring and dowel drilling.
The size of mortise required on almost any oak framing is too big (say 40 wide, 150 long and 100 deep in a 200 x 200 beam) for a mortising attachment and square hollow chisel drill bit. Another advantage of the chain mortiser is mobility. You can’t get a piece of 200 x 200 oak into a pillar drill. With a mortiser, you carry the unit to the post. You can even make a mortices high above the ground, with the machine clamped to a vertical beam.
Of course, you can get a good forstner bit the size required, drill out as much the wood as you possible and pare back the rest with a chisel. Or just use a chain mortiser and do it quickly.
Makita chain mortiser
Even if you only do one project with your Makita chain mortiser and sell it on it will be worth it in the efforts you save. This fantastic tool will save you days and your sanity! 12 amp 100 volt models have enough power to use it without any problems.
Mafell chain mortisers are top end machines no question, the Festool units are a beast as well. Both are pricey, but the Festool is waaaay tool expensive. The Makita is a little slower but affordable option.
This chain mortiser is productive and reliable machine. You can use it for months and years with tightening and oiling the chain as the only maintenance. The chains are quite expensive, but you can cut each beam for a 30 x 50 foot barn using the original chain. Just let the weight of the unit do the working and don’t force it too much.
Chain mortiser tips and tricks
Do not rush
A chain mortiser is quick and productive tool, and it is possible to do a lot of damage to a timber when you make a mistake with layout. A boring machine or drill drill gives you more time to think. Attentiveness = accuracy, as ever.
Chain sharpening
Mortise chains are expensive and Makita says they can’t be sharpened, but but there are plenty of companies who will do it for you. Just google and you’ll find quite a few.
Safety
A good operator is the best safety. Chain mortiser is a cutting power tool and accidents unfortunately happen.
Reselling
A chain mortiser is an expensive, but easy-to-sell tool. You can build few frames and then maybe resell the unit and lose a couple hundreds on it. Believe me, such a ‘renting’ is something you would gladly do for a couple hundred dollars. Or, if you don’t want to invest (at least temporarily) then a a chisel and drill will be your companions on a trail of misery.
Conclusions
I vote for getting the chain mortiser. The traditional methods are good, I admire and respect, but sometimes you need to conserve your energy for tasks that don’t have power assistance option. And you’ve certainly seen lots of people looking for used ones so it won’t be a problem reselling it. The chain mortiser was the first tool I bought other than chisels when I started framing.
I don’t like buying a second hand, but if you are not ready for such investment, carefully check chain condition, locks, etc carefully. A used tool may not look great, but main parts shouldn’t be worn out. If you are buying the first mortiser, look for a brand new one with a warranty.
Do you want to do the work a normal hammer and chisel can do faster and easier? The electric chisel will help you to perform a pretty smooth, controllable and continuous carving with perfect depth and direction control. Moreover, you can find many chisel profiles for a decent price and change your chisel blade at the click of a button. Intrigued? Read our article to find out more!
Table of Contents
What is an Electric Chisel and how it works
The power chisel uses a reciprocating action, with the user simply guiding the tool during carving. Electric chisels are used to make joints, precise corners, for wood carving, etc.
Carving process is different to shaping (see also best Dremel bit for cutting wood). The carving is achieved by slicing the chisel by pushing it into the wood. On the other hand, a rotary tool shapes wood by its abrasive nature and leaves much rougher finish than hand chisel.
In my opinion, using a power chisel is not “really” carving and nothing is like hand made. However, electric chisels reduce work time and increase productivity in a pleasant finishing phase.
Once again, neither rotary tool, nor electric chisel can’t do everything. Power tools leave machine marks you need to remove, and very fine details like fur, hair and feathers need to be carved by hand chisel.
Power chisels review
Arbortech power chisel
The most common use of Arbortech tool is to take out the bulk of the wood and finish off using the power sanding and hand chiseling for a finer finish. The the tool works really efficiently and is easy to use.
The chisel is equipped with a 710W motor and the blade makes up to 11000 strokes per minute for continuous cutting even in the hardest wood. The noise and vibration are relatively low for the power. Good news here are for allergists and asthmatics: it makes chips and not dust. The chips are also easier to clean up.
My advice is also to get better chisel pack for a larger variety of uses and cut types. The blades included in the set are of inferior quality, do not hold an edge and need to be sharpen too often.
Of course, it is noisier and heavier than hand chisels. It’s too heavy to hold comfortably for a long time. The wrists became sore after 5-10 minutes and I couldn’t achieve the results I want with this carving chisel. You have to use a little oil every 15-20 minutes. It isn’t a big deal, one way or another you need to rest your hands.
Lighter electric wood carving chisel
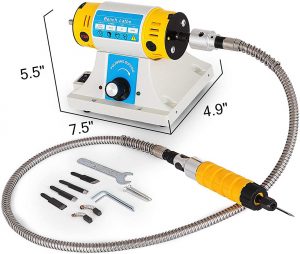
An Automach electric chisel is much lighter, less powerful but more convenient for detailed carving. The vibrations are almost invisible, the noise is low too.
The chisel is equipped with 80W motor, the body is made of aluminum. The weight is 1.75 pounds (Arbortech is about 6.4 pounds). Similar to previously reviewed device, the tool keeps blades motionless until pressed against wood. The chisel blade does at 10 000 one millimeter strokes per minute. The set Includes rear switch, 6′ cord, five blades and a hanger.
This electric chisel is very good for detail work, it changes direction pretty much as you wish it to do, without tear out. And it makes much less stress on wrists, hands and arms. The only downside to this power chisel is that for about 20 minutes it gradually heats up until you can’t hold the tool comfortably. With 2 machines, you can let one cool while working with another.
The gouges included are decent quality, but if you order the Flex-cut Power gouges, it will be a good pairing. All in all the Automach electric chisel worth the price, it is very well made and will last forever for moderate duty tasks.
Power chisel for Dremel or similar rotary tools
You can attach power chisels to a Dremel or another rotary tool (see also best Dremel bit for cutting wood). These chisels are the most compact, lightweight and are the most convenient devices for carving small details. Since they don’t have own motor, the price is the lowest too.
Since the chisels for rotary tools are portable and compact, they are good for cleaning up difficult corners and working in tight places. These attachments are also pretty reliable, usually quite a few flexible shafts need to be changed without any problem with the device itself.
Given the extremely low power of Dremel tools and problems with flexible shafts fitting, my advice is to overpay an extra $50 and buy something like VEVOR Electric Chisel. It is equipped with a 350W variable speed motor and is capable of operating for hours under moderate load.
The choice of an electric chisel depends on the tasks you set for yourself. The more material you need to remove, the more powerful and large the machine should be. At the same time, smaller units are easier to operate, better controlled and better at carving small details.
Air compressor is an important appliance for saving time, reducing fatigue and providing more professional results with pneumatic tool. It is also an essential instrument for a wide range of tasks from automotive repairs to carpentry and crafts. And when choosing a compressor, everyone takes into account its performance and pressure, however, noise levels are often an underestimated issue. For example, Briggs & Stratton 8 Gallon compressor makes around 90 db at roughly 3′ distance. It will definitely cause a headache if you cannot locate the device remotely. In our post, we will help you to choose the best quiet air compressor to help you stay healthy and productive.
Table of Contents
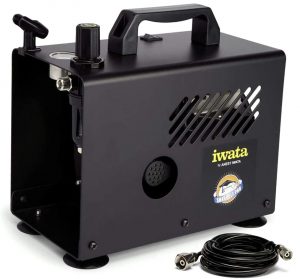
Quiet Airbrush Compressor
Good example of oil free seriously quiet airbrush compressor which works well for daily use is an Iwata-Medea Smart Jet Pro. It is it very quiet and satisfactory for use with a regular airbrush.
The Iwata comes with an airbrush hose in it, approx 6 ft, but it’s pretty thin one. It is almost silent air compressor, one of the most quietest units. The max pressure is around 40-42 psi. The Smart Jet Pro works really good with an airbrush needle of 0.2-0.3. If you need to lower the pressure, this tool has a true regulator without loosing the auto-shutoff functionality. The motor works about 30 seconds then the tank becomes filled up and the compressor shuts off.
Quiet Portable Air Compressor
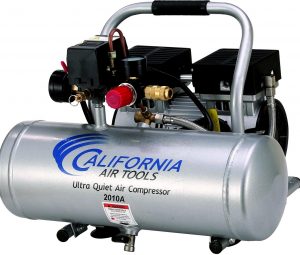
If you often use an with a larger needle for faster and better coverage and with a gun, a SmartJet will struggle. More powerful California Air Tools compressor that is also advertised as silent airbrush compressor (but in fact, it is “quiet” enough only in comparison to a large industrial compressor). The unit handles an airbrush quite well and a paint gun with higher load (it runs a lot more of the time).
A compressor with a larger air tank is also handy for a lot of airbrushing. A more powerful motor may be louder, but when it reaches pressure, the compressor shuts down.
Therefore, if you are going to move to something larger in the paint gun category, choose a compressor with more horsepower and be ready to stand the noise. If not, the California Air Tools or Iwata may be fine.
Small Quiet Air Compressor
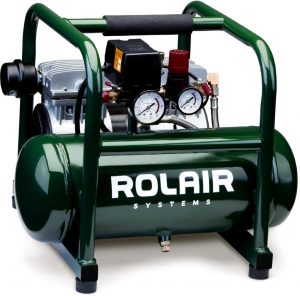
California Air units are pretty quiet, but they are not silent. If you need a really small quiet air compressor, my advice is to purchase a Rolair JC10, it is shockingly quiet machine. This compressor is an excellent addition for drying out parts and blowing dust. And it is quiet enough that you can talk over it without raising your voice.
The Rolair JC10 Plus is very quiet compressor to begin with, and having it under the desk makes it even quieter. The frame is equipped with rubber feet and the unit also is rubber mounted to the frame. This design reduces vibration transfer to the floor. It is very important if your floor is in house.
The compressor comes up to about 100 psi (full pressure) in about 80 seconds and recharges the tank in a few seconds when using a nailer.
How to Make Air Compressor Quieter
In high pressure compressors the intake is a source of noise. I assume you can quite down the machine by putting some kind of a silencer or baffle system on the intake and it will help out a lot.
Air Compressor Silencer Boxes
When choosing silencer box, make sure it does not restrict air flow. I recommend do not put the silencer on the intake if that has any orifice smaller that the intake you already have.
In other words if you have a 3/8NPTM threaded end, using 1/4″ will restrict the flow by the inlet hole. Since you only have atmospheric pressure on the inlet, resulted pressure differential will decrease your efficiency. Bottom line make sure both the inlet and outlet sizes of the silencer should be the same or larger than the g’zin on your compressors head.
Industrial Air Compressor Silencer
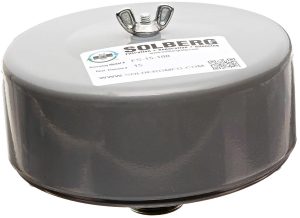
Industrial air compressor silencers improve the filtering and reduce intake noise simultaneously. The difference in noise with a good silencer is very noticeable. You can expect a 3 or 4 db reduction in noise.
For example, I’ve used the Solberg compressor silencer after the upgrade to to 80 gallon compressor. It works like a charm, and the machine is a little quieter and deeper tone. Solberg filters are good quality and they are a more common size and cheaper than the smaller OEM filters used before, so it should pay for itself in the long run.
DIY compressor Intake Silencer
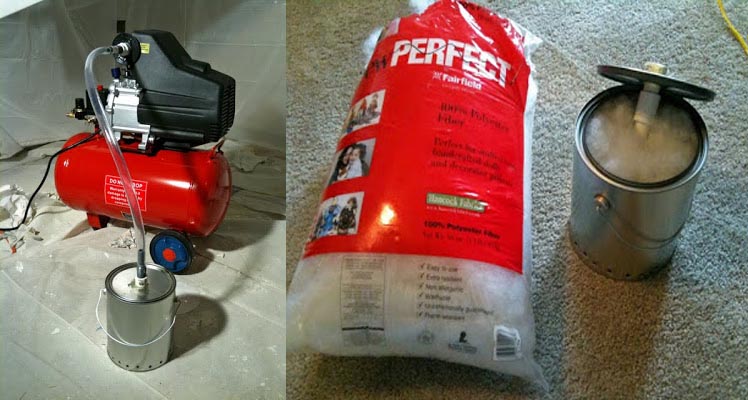
You can make simple DIY silencer with 1 gal can, PVC connectors, hose and loose polyester pillow fill for about $3.50. Pack the fill relatively light in the can, make holes at the bottom of the can and attach the connector to the cover. If there are no discernable restriction when you breath through the system, the compressor will work fine
Air Compressor Intake Silencer DIY
You could also make a muffler for the air compressor which would make it really quiet. The materials are quite inexpensive:
Pipe, the size is as an air compressor port – about 15″ long
Exhaust pipe, the same length
Washers, made that they will fit around the air compressor port pipe and fit inside the exhaust pipe
Steel wool, a drill and a welding machine
You can make a silencer similar to the gun mufflers, there are a lot of drawings of them, if you don’t imagine the design. If you make it right, your air compressor will be quiet and you will almost not even know it is running.
Remember, that after building a muffler you have to equip it with a filter. Otherwise, dust, rust flakes from the inside of the silencer, and the occasional giant mosquito are going to get into compression chamber and the life span of the pump will suffer.
Conclusions
Besides compressor design, the tank size directly affects output. If the tank size is big enough, your compressor will run as little as possible and you won’t listen the run most of the time. With a 80 gallon tank I sometimes forget to turn my compressor on and use impacts or blow stuff off with stored for a few hours before I realize I didn’t turn the device on.
My grandfather was a carpenter and taught me all I know about woodworking. When I got a room for a workshop, the table saw was one of my first purchases. Choosing tools is a common challenge for beginner woodworker and in this post I will share with you my experience in choosing the best table saw for beginners.
Table of Contents
Table Saw Tips for Beginners
There are two main approaches to choosing a saw. The first and most common advice is to buy a fairly expensive tool of well-known brands. For about $800 you can get a saw with a large table, 2 HP motor and extensions with a reasonable fence. For about $1100 you’ll find a unit with a great fence, 3 HP motor, a large cast iron table and this setup will last for decades.
The second approach is good for DIYers who use a saw from time to time. It requires more attention, but saves a lot of money for other tools. You carefully choose cheaper device that meets only your basic needs. Of course, a lower-priced “home-use” level saws are not top notch ones. Nevertheless, some $150-300 table units easily last 10 years, even with frequent use and moderate load. Yes, they are not pretty, but work well enough to make acceptable straight cuts. Cheap saws often do not have enough power to handle tough work, but these tasks are not what you should consider “home use” either.
Personally I tend to advice buying expensive table saw. I think, you can make most any “DIY projects” without this tool. A table saw will likely be among your most expensive tools, so why not get into this hobby (if it’s not full time job) using the tools you have? As you gain skills through doing a lot of projects, buy high quality power tools you really need. Buy the best unit you can afford, one tool at a time.
Best Table Saw for Beginners (DIY and hobby use)
My advice here is choose middle-priced tool, not the cheapest one. Don’t buy junk tool. The Delta is a good example of a relatively cheap table saw of decent quality. You can afford it, and it’s compact enough to move around with ease. And take into account that no matter what tool you get, you are still have to learn what good setup is how to do a proper setup to get the most out of the saw. If you want to make precise cuts, the proper setup will be the critical factor.
The good news about Delta is that if you get a decent full-size saw, you can sell it for a good price if you outgrow the tool. And by that time you will clearly understand why and what you need in the upgrade.
Portable saws are typically low powered and mobile devices. They are in the $150-600 range and are harder to upgrade and modify.
Table Saw for Beginner Woodworker (Professional Use)
When it comes to starting a woodworker career, choose a tool bigger than you need now, if you can. Both in power and features. Like almost all of my friends I will say “Pound for pound, Grizzly make the best tools at the best price”.
Generally, the choice of the table saw depends on your budget, your needs and the space you have in your shop. Cabinet saws are the best, but most expensive, up to $2000-$3000. Contractor and compact saws are next. Contractors have larger beds then compact and they are made of cast iron. You can find contractor saws with extra accessories and upgraded fences.
All these models have their pros and cons, but the contractor’s saw is in the middle as far as weight, accuracy, size, cut capacity, cost, etc. What’s more, if you work in a small shop, you can buy a fairly cheap mobile base to get the saw out of the way after the job is done.
Conclusions
If you plan to work as a professional woodworker, buying a table saw is a lifetime investment, therefore, make a right choice and you’ll not regret spending the extra money.
If you’re just starting out, look for a decent used table unit. Spend some time and you’ll definitely find a guy who is moving out of town and buy a tool that work well. If you buy a new tool later, this will be a great second saw for light duty work, so you don’t have to change the blades all the time.
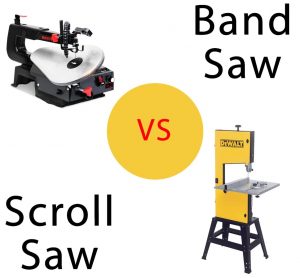
Scroll saw vs band saw – how to choose the right tool
Scroll Saw vs Band Saw is a frequent problem for the beginner crafters. The winner depends on which tool will make the cut more effectively and/or easier. In our review, we’ll help you determine which features are important to you and which type of saw is best for your project.
Table of Contents
Band Saw vs Scroll Saw: What They are Designed for
Scroll and band saws are generally designed to perform the same work, but the scroll one is used for the finer and smaller cuts and the bandsaw for the bigger cuts.
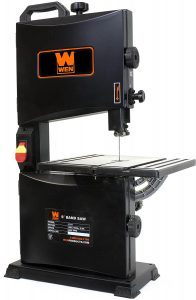
Band saws are bigger machines capable to cut thick boards, resaw wood, etc. They are designed more for building projects that require thicker material.
Compact WEN 9-Inch Benchtop Band Saw – good for larger boards (check the price)
The scroll saw is great for inlays, Intarsia, and other small work. It cuts small pieces fine, but even soft pine about 2″ thick go very slow. If you use a great blade like a silicon blade from tuff tooth, it will help a bit, but the weaker motor tends to stop and blow the internal circuit breaker when you try to cut hardwood.
Nevertheless, the scroll saw can do so cleaner and tighter cuts, than a band saw… And its blades are much cheaper unlike the ones for a band saw. There are a lot of blades’ types and they can be switch quick and easy.
Single speed band saws are too fast for metal. Scroll saws are typically variable speed, and you can cut metal with proper blades. The saw wouldn’t cut 1/2″ steel plate, but it can handle small and thin steel and brass parts quite comfortably. For larger metal parts a variable speed jigsaw would work better.
To see the capability of a scroll saw for cutting sheet metal, take a look at the video. Take into account that it looks like he’s using a Hegner which costs about $1500.
Scroll saw is the only tool that will let you back up out of a corner, it will cut both ways with a round blade. Maybe, you need to have both on your shop 🙂
Difference Between Band Saw and Scroll Saw
A bandsaw have a band blade of toothed metal stretched between 2 or 3 (sometimes more) wheels. The minimum radius of a curve is relatively big and is determined by the kerf and width of the band. Band saws have more powerful motors, they can cut thick boards and resaw them. A 14″ band is able to do many jobs and may cost less than $300. Its blades are hard to break and they last long.
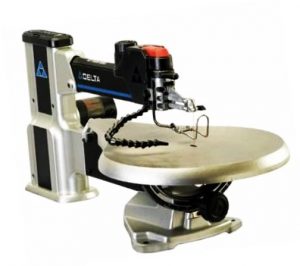
The scroll saw is a smaller device for detail work. It uses a thin and narrow reciprocating blades and like a hand coping saw, it can be placed through a pre-drilled starting hole to make interior cutouts without an entry slot. Most scroll saws have relatively low power motors and work without overheating with up to 2″ wood. And I would consider this measurement to be on the optimistic side.
If you purchase a cheap scroll saw you will be wishing that you had gone ahead and bought the band saw. A noname bandsaw will still perform a decent job. So, unless you are ready to spend at least $300 – 500 on the scroll saw, don’t waste your money.
My advice here is a Delta Power scroll saw with electronic variable speed for a wide array of cutting applications. An upper arm of the saw lifts and locks in the raised position during blade changes or while adjusting blade position for fret work. Bevels 0° – 45° left and right.
The tool has minimal vibration, the blade stays put and it works whisper quiet. It is a great unit for fretwork and general purpose cutting. The Delta 40-694 is also pretty similar to the DeWalt DW 788, but costs about $100 less. If you do any amount of scrolling or intricate cuts don’t hesitate to buy this.
Band Saw or Scroll Saw: Pros and Cons
A scroll saw has the advantage for tight curves and internal cuts. Its narrow blade is capable of creating small curves. The intricacy of the shapes can be astonishing, for thin sheet bits of wood or board you’d want a scrollsaw to get into finer corners that a band saw would struggle to achieve. The cuts are so clean, that you often don’t need to sand them, but cutting is very slow.
A main advantage of a band saw is an ability to deal with larger pieces of material. Blades of a band saw are wider and thicker, so I wouldn’t want to make too much fine cuts on a bandsaw. The kerf of the band saw blade allows for some amount of curve, but if it is too tight, the the blade binds in the kerf and may stop the saw. In this case, use a small stone and round off the back corners of your blade after placing it on your band saw. This will make it easier to trim the corners. And since the gullets on a band saw are relatively big, you won’t have a hard time clearing all that saw-dust. For 2″ or thicker pieces, it’s a no-brainer to stick with your bandsaw.
Good example here is a 14″ 1 HP Steel Frame Band Saw by Delta. It has heavy duty steel frame with aluminum trunnion table support. The 1 HP motor works with 2 speeds: 1,620 and 3,340 FPM for cutting wood and non-ferrous metals. The saw is pretty compact and works very quietly and smoothly. Cast iron table is big, sturdy and well-finished. Wood, copper, aluminum, and even stainless will be cut like butter with a proper blades.It is a simple and fairly priced tool, the best choice for those who decide to buy a band saw.
Conclusions
If your typical work is roughing out forms to carve, the band saw is your choice. For precise cuts, a good scroll saw is an indispensable tool. My advice is to purchase a quality scroll saw with a quick-change blade holders. A well-known brand saw will serve you better and retain resale value much longer than an entry-level saw.
Most of my friends made their first saw-horses themselves. And when homemade wooden ones come to the end of their life they have upgraded to better unit. The same it true with me. I was tired of the weight and the size of my DIY units too. So, I did a little research and in this post I will share with you my priorities and opinion on the best saw horses in 2021.
Table of Contents
General information
A saw-horse is a tool that helps to support wood, plastic or other material that is being cut either with a jigsaw, hand saw or other tool. Sometimes they are used to create a sturdy work surface for your work. Saw horses should be low enough to reach across the width of a sheet of material. It’s also good if you are able to keep a couple sacrificial 2x4s. 3 work better and you can put the 3rd one under the lengthwise cut, the piece doesn’t drop.
Horses with a broad top that can easily support a 1×10 that’s two feet long say. They are also preferable to have the sides flat. For me, sawhorses are all about sawing, but not about standing on or raising up furniture. These are in fact “work stands” and they are designed by very different factors.
Best Folding Saw Horses
I have a good experience using the Trojan Horses. They are strong and durable and with a couple of pieces of 2x lumber you can create horses of any size. My fellow carpenter has several sets in which he cut the legs and added some angle iron so that they can be adjusted for uneven ground. The set up requires no screws or nails, the saw-horses are gripping teeth, and legs self-level to any terrain.
These saw horses are at the top the list for portability and strength. They will last you 10 years and more and all you’ll need is to add some missing paint and add a little oil on the joints. You won’t find a more versatile set of saw horses. Yes, they are pricey, but worth it, these are the best folding saw horse. You can’t beat the Trojans for heavy duty durability.
Although I love the Trojan saw-horses for their reliability and the fact you are able to use scrap lumber, their significant downfall is that they are not adjustable.
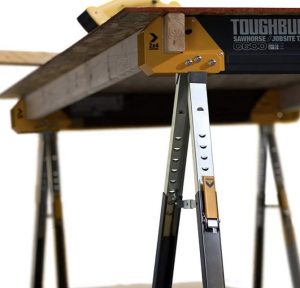
If you really need to change the height, I recommend ToughBuilt Saw-Horse – best collapsible saw horses. They are advertised to hold up to 1300 lbs per pair. If not for the fact that they can take a finger off when folding them up, they are perfect. You can clamp things down to them, the feet are adjustable and cleverly they have convenient yellow clips which allow you to mound large sheets of material at angle. This way you can rip them along the long and short edges. ToughBuilt saw horse with triton superjaws are all I need when I am out and about.
On the top of the horses there are holes to screw 2×4’s onto. They are fully adjustable, and the rubber feet won’t damage a nice deck. When breaking down sheet good I use them for a cutting table.
The main disadvantage is they are a bit heavy to carry but the slim nature means you can just stack one on top of the other in the garage. The metal clamp on each side comes out to accommodate various sizes of timber.
Best Plastic Saw Horses
Plastic saw horses are often adjustable, therefore no matter what your height is, the work height will be comfortable. What I like the most about the plastic saw horses is that they compact in folded state, so they store easy and flat. They’re light-weight and easy to carry.
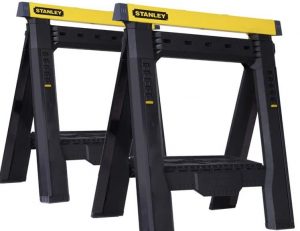
Great example here is Stanley STST60626 Adjustable Sawhorse Twin Pack – good unit for for medium to light-weight use. They are made entirely of plastic and are not flimsy at all. Each set held a large stack of lumber with no ill effects – rated load is 1000 pound per pair. Each horse has height adjustment latches and allows to adjust width. The tray opens for holding tools. Good choice for the small repair or decorating DIY projects.
Best Log Saw Horse
I’ve used a several different types of log sawhorse for myself and customers. And my opinion is that the best way is to build your own stand.
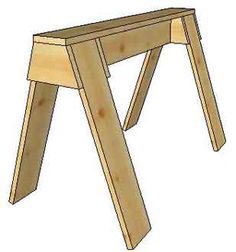
DIY Saw Horses
Making own folding horses is pretty easy.
DIY saw horses – strong and sturdy
I’ve made 3 sets like these on the picture out of spare 2x lumber I had. Three sets total so far. They are cheap, rock solid and nest perfectly on top of each other, so all six horses are stacked in the corner and doesn’t take much space. I have poured 3 kitchens worth of concrete counter tops on them and wouldn’t hesitate to put my truck on them. They are a little heavy though.
Conclusions
Toughbuilt C600/650 setup are pretty sturdy and height-adjustable (key feature for many carpenters). Trojan Horses are the most strong and durable model which will work virtually forever. Plastic saw-horses are great if you need lightweight and portable tools, easy to carry and store.
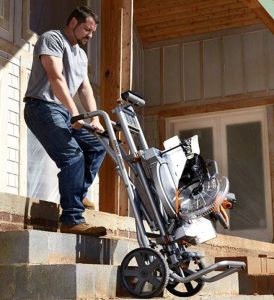
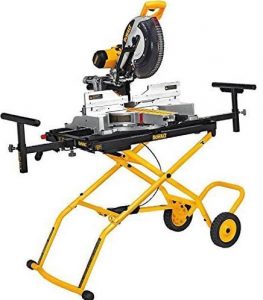
For small projects you can just clamp miter saw to a workstation, but cutting miters into lengthy trim pieces needs a real stand. Most of woodworkers don’t really want a bunch of bell and whistles, best miter saw stand should be as light as possible an at the same time sturdy and reliable. The unit will definitely be transported back and forth, so it should not be weak and fragile. However, the stand is not a tool that you will use 24/7, so it shouldn’t cost you an arm and a leg either. Read our article to make an informed decision and purchase the best tool. Any and all suggestions and comments are welcome and appreciated.
Table of Contents
Miter saws are a good tool for accurate cuts, but a proper stand adds a lot of simplicity and accuracy. Good unit can be set to needed height so you don’t hunch over uncomfortably while you work. Best miter stand saw can be adjusted for different lengths with featuring pull-out rests to hold the wood.
When buying a stand, stability is a top-priority consideration. It shouldn’t be wobble, regardless of the material being cut. Shifting stand and sudden jumps can cause injury! So rubberized grips on the feets or locking wheels add stability to the the stand. The weight capacity of the most stands is between 300 to 700 pounds. A miter saw produces a lot of force, so the stand should be durable.
Best Portable Miter Saw Stand
Saw stands can range from lightweight full-portable foldable units to large stationary stands. Big units have the highest load capacity and the ability to cut long boards. A medium-sized miter saw stand may also include wheels. Smaller miter saw stands are easy to move from one place to another, but they usually have a lower weight capacity. Average-sized portable units have weight capacity around 500 pounds.
My opinion is that a question about best portable miter saw stand doesn’t has much sence, they are mostly the same. Any middle-priced unit made by known brand will work. The one thing to consider is that you you most likely will need more clamps for different saws in the future. Therefore, I recommend to choose a brand that will produce and sell clamps for next 20 years.
If your shop is limited in space, look for the stand that folds up smaller. Some units are more than 7′ long, even folded. You may also like having supports close to the miter saw too, not just way on the outside.
For me, the best rolling miter saw stand is the Ridgid rolling/folding stand. Yes, it weighs a bit, I always can fold up and roll away at the end of the day with ease. And this is what I looked for. I can also leave the saw attached and place it vertically in a corner, and this fact is a win for me. Take in mind, every time you have to remove the saw, you spend time and wear mounting components which will inevitably get broken via handling and transport. Ridgid miter saw utility vehicle is a good stand if you want to leave your saw attached.
My previous unit was a cheap foldable Ryobi stand, just 4 legs and quick release brackets. It was a lot lighter, but in my case the rolling stand is much more convenient.
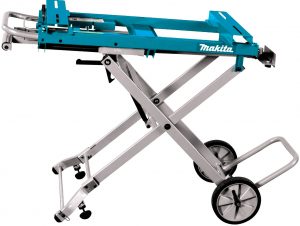
Another example of great miter saw stand with wheels is Makita WST05. It comes with material support extensions and adjustable leg supports. The aluminum feed roller and adjustable material stop help a lot in making repetitive cuts. The design is sturdy, robust stand for the money.
The only way you can make it better is to purchase a 10″ pneumatic wheels from HF and upgrade to a wider wheel base. The stand will become super sturdy and absorb any bumps when wheeling.
Best DeWalt Miter Saw Stand
DeWalt Miter Saw Stand With Wheels
In my opinion, absolutely best values here are the Dewalt heavy duty and Bosch gravity-rise miter saw stands. I have the rolling Dewalt but if it wasn’t tossed in with my saw I could have taken Bosch with equal probability.
DeWalt Miter Saw Stand DWX723
DeWalt miter saw stand dwx723 (Heavy Duty) is very nice and sturdy unit. This stand is a good choice for those who prefer not having wheels because the saw has to be removed to carry the stand. Yes it’s little more efforts but there is less risk to tip over the saw and damage it during transporting.
The stand is easy to move around with the legs folded down lifting the stand by the handle. You can hand carry the saw separately, then set up the stand and snap the saw on top.
DWX723 comes with brackets, there is no need to buy them. This table is great! The stand is extremely stable and pretty simple to set up. It folds easily and is conveniently to transport. The ends extend to support up to a 16 foot piece and come with two supports (you can purchase more or wider ones additionally).
Dewalt Miter Saw Stand DWX724
DWX724 is the most lightweight and compact miter saw stand with weight capacity up to 500 lbs. Its weight is 29.8 Pounds (the 723 is 35 Pounds). DWX724 is slightly higher in folded state (8″ vs. 7″ of DWX723) and is much narrower – 44″ (the width of the DWX723 is about 77″).
The beam of the DWX724 is 3.4 feet long, so you can work with a 10 feet maximum length of material (much shorter than 16 feet length capacity of a 723 model). The maximum weight capacity is 500 pounds for both models.
Once the brackets are attached, one person can easily attach or remove the saw from the stand. A metal locking bracket on the unit keeps the saw from moving from side to side and adds a bit of extra stability. The stand feels very sturdy, the rubber feet prevent damage to the finished floor surface. The bottom handle is convenient for carrying the stand separately from the saw, all you need is to lock the material support struts. Great choice for those who don’t work with long pieces of material.
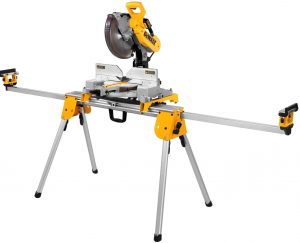
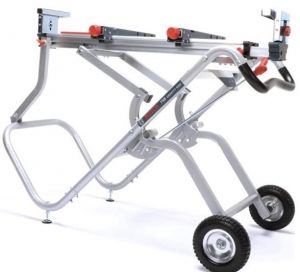
DeWalt DWX726 Stand
The miter saw weighs a lot, and because it’s also a bit bulky, you have to carry it out far from my body and it really wrenches the back hauling it around. So the DWX726 rolling stand is a great alternative to the units on legs.
You can leave the saw attached, collapse it, and instead of lugging, roll the whole setup around. The DeWalt DWX726 is a beast and weighs in at over 60 lbs on its own (twice the weight of the DWX723). The saw bolts solid to the stand and the set up is going to be about 110 lb.
You can load the DWX726 in the truck by putting the handle end on the tailgate, lifting the wheel side and sliding it in. With this approach you never lift more than about 50 lbs, including the weight of the saw.
DWX726 is everything-in-one package and is good for both a permanent setup and a portable one. With the extendable arms, you can make cuts of long trim. It very easy to lower and raise the stand, the wheels make it easy to move the set even up and down stairs by one person. The wheels are large enough for almost any terrain.
In general it is solid and heavy duty stand, mostly for workshop use and large field projects.
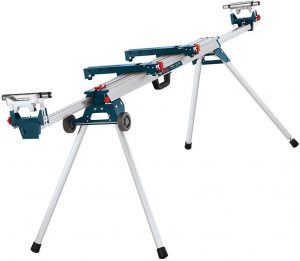
Bosch Units
It’s hard to beat the quality of the Bosch miter saw stand and nothing makes your life easier than having the right tool for the job.
Bosch Gravity Rise Miter Saw Stand T4B
Bosch gravity rise miter saw stand T4B Bosch Gravity Rise is a device that can be recommended with confidence. It is easy to lower and raise and the built in outfeeds are very handy. It’s very easy to load into the back of the truck if you need.
The quality is very good, the only two drawbacks are that the supports are more narrow then I would like, so the trim can slip off the side. The second is a size: it really takes up a lot of space.
This stand is pretty heavy, as it’s frame is steel. But you can roll it and the saw never has to come off to transport unless you want to. You can roll it on a cargo trailer effortlessly with a connected saw. The folding mechanism is very nice, in that you don’t have to bend way over or use a lot of leverage.
The knob tightening saw rails is very nice, in other stands I’ve used the saw with the quick release clamps. And they almost never fit tight when installed. With Bosch you just tighten the knobs down and it’s very secure.
The weight of the stand adds stability, but if you really need to load this into the back of a pickup, purchase of the lighter stands like a Bosch leg miter saw. But if you had a ramp, the rolling Bosch stand is the way to go.
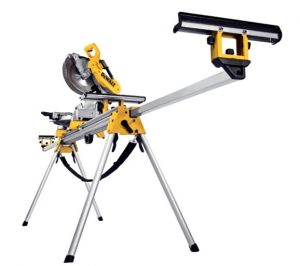
Bosch leg miter saw is a lightweight aluminum stand which adapts to most miter saws. Its quick-release lock allows to attach the saw to the stand with ease. Carry handle is equipped with a wrench storage and is convenient for transporting folded saw. Sliding rails expand up to 12′ 9″ to support up to 16′ material.
The Bosch folding leg miter saw uses the same saw mounts and main beam extrusion as the T4B. You can dismount the 4310 from the T4B and just clamp in on the GTA 3800. Material supports are interchangeable too.
The GTA3800 is clearly superior choice for shop use. For site work, the T4B is the best unit, if you have a ramp to get it into your trailert/ruck/van.
Conclusions
A miter saw without stand is like a knife without a sheath: more hassle to carry and use than it needs to be. The same is true for any cheap unstable unit or even a homemade stand. But if you need the best stand for your saw I recommend a Bosch or a DeWalt stand.
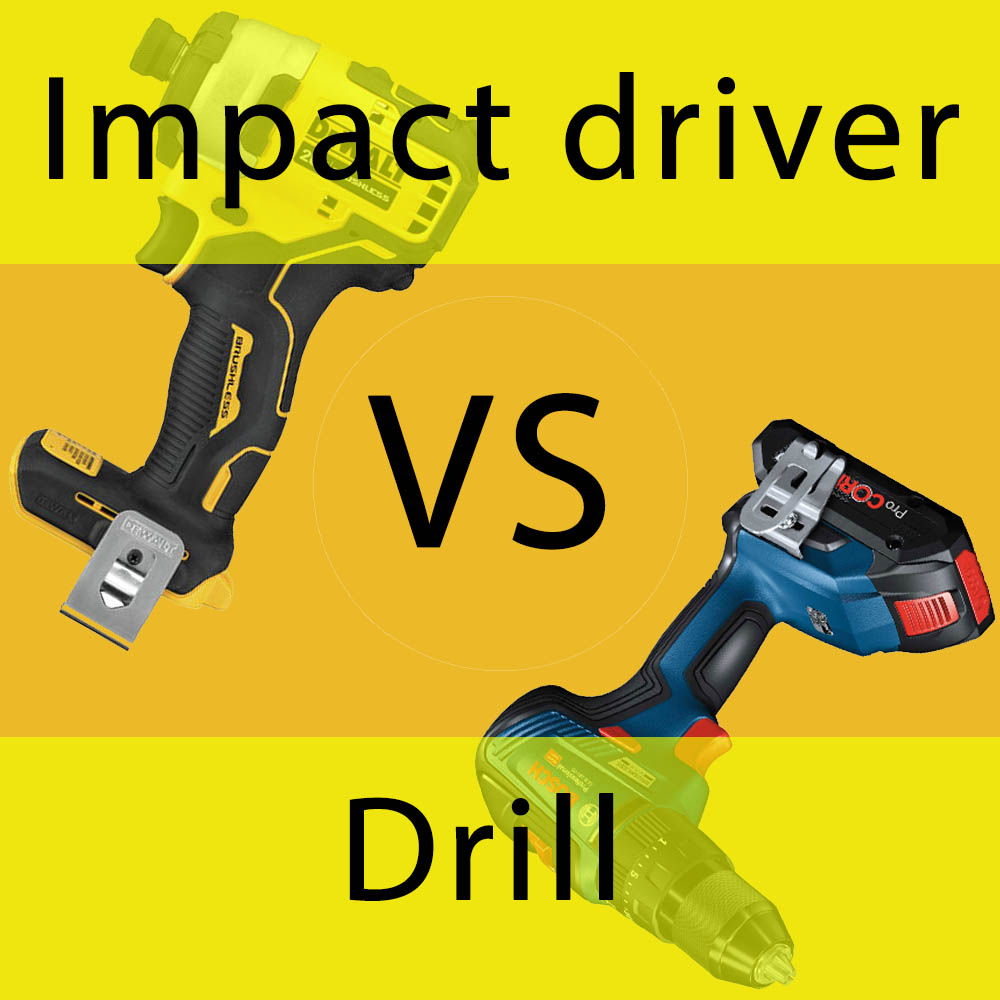
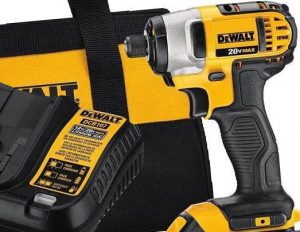
I use a DeWalt tool as a drill and driver for my regular activities. It is a regular drill without hammer function. Nevertheless I like my impact driver and few years ago I only used it. The reason is that each tool has its own advantages. In this article, we will discuss and determine the winner of the Impact Driver vs Drill competition for specific jobs.
Impact drivers are high-torque machines primarily used for tightening nuts and driving screws. You can use only ¼-inch hex shank in their chuck. But bit change is fast and simple, you either just slip the bit or pull up on the chuck sleeve and put the bit there.
Impact drivers are smaller and lighter than drill drivers and though they are not as versatile, the torque output is much higher and they get through work more quickly.
Generally the impact driver is for work with screws and it is very superior especially for commercial contractors who do it all day.
Drill
Impact drivers nevertheless are not universal choice.
They make noise and clients often ask to be quiet. Plus, I find it may do too much damage when using it. They don’t give proper feel when screws biting in, and too much power.
An impact driver is a little similar to a hammer drill, BUT hammer oscillates the drilling action towards the surface into which a drill bit is driven. An impact driver produces the rotating force parallel to the surface into which the fastener is driven. So hammer drill vs impact driver problem is incorrect.
A drill is a more versatile tool. You can use it for both making holes and driving screws. In its chuck you can fix hex bits and conventional drill bits. The drill generates a constant torque that is easy to control to work with small screws and drywood.
At the same time, a drill is a continuous drive device. So, you have to resist with your arms all the torque applied to screw. An impact driver is not continuous drive makes interrupted, short, rotational impacts. Therefore, when you drive a large screw, the driver twist your arm off much less. This is very good for bolts and screws, but bad for Forstner and spade bits, hole saws and large drill bits.
Power drill vs impact driver
Using drill or impact driver mostly depends on the task you got to go through. If you are driving any kind of screw the first thing you should reach for is the cordless impact driver. It gives a “rata-tat-tat” as they torque into the fastener. This process performs high turning power in a small package with less stripping of fasteners then it’s common with drills. Moreover much less torque from the tool is transferred to your hand.
The impact driver has big advantages
Bit usually stay in screw head better and it doesn’t jump out
Impact won’t twist the arm like a power drill will. Running an impact all day is much easier on the elbow and wrist than using a drill
When driving large screws depth control is much easier with the impact than
and few cons
The impact is much noisier and for work all day long you need to use ear protection
When working with small screws and drywall it’s easier to work with a drill
For occasional use the drill is much more versatile and convenient. You may use it for just about everything, and nobody will ever complain about the noise. You can carry a set of screwdriver bits, good HSS drill bits, spade bits and it will cover pretty much anything.
Also, be careful not to let the bit slip when starting the tongue-tites – it’s a tiny tip and rotating clockwise will dig itself into your thumb (which will be holding the screw) before you’ve even realised what’s happened.
If your floor is engineered then pilot-holes won’t be needed as you’ll be going straight into ply on the tongue.
If you need to work with large holes, compact hammer drill with an anti-kick shutoff so it doesn’t twist your wrist off if it binds on something.
Cordless drill vs impact driver
If you are professional contractor, you need both. As an example, when working with solid wood floor you need to pre-drill smalla pilot holes for tongue-tites. Constant swapping from drill bit to torx bit is just a headache. But if you can only have one then a tool like Makita drill/driver combo will be far more versatile. It’s quite cheap to get a second bare machine so you can easily upgrade to having both.
An impact driver is great for screwing in screws but not much good for anything else. It has a female hex and has an impacting action, even with a hex shaft drill bits impact driver is not nearly as good for drilling as a drill.
Guys who carry tools with them often want to carry a compact drill as it’s versatile tool. But the impact in the same case gives you a lighter weight device to drive screws.
Conclusions
I can’t imagine professional woodworker using a drill to drive screws these days. And I did for years until I used my first impact. Sometimes I even use my drill driver to make a hole with a quick change drill bit.
But in general, the undeniable and obvious advice is to use the right tool for each task.
Use a drill to make holes
When removing screws, I use an impact unless it’s likely the head will strip, then I use a drill driver.
If the noise is a problem, get a fluid drive impact.
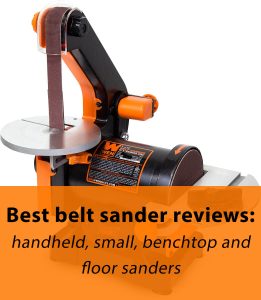
Long time ago I bought both belt and sheet sanders. The sheet device was replaced few times, but the belt one worked flawlessly. And finally, when my 20 year old belt sander (it seems to be Skill) gave up, I was wondering should I replace it with a small and cheap device or something better and may be heavier. I will share here some thoughts and the results of my search for the best belt sander on the market.
Table of Contents
Best Belt Sander Under $100
All you need to know about inexpensive sanders is motor torque. Small sanders for DIY tasks with low power motors are very easy to stop with a piece of steel pressing to the belt. These devices are good enough for cleaning a bit of rust, deburring, etc.
Cheap sanders can sand well, but you really need to keep them clean and lubricate from time to time with some dry lubricant. If you let them build up with dust, the belt begins to walk off running it. In this way for light DIY and all purpose work you can use almost any tool. But wide-known brands such as Bosh and Dewalt will almost never let you down.
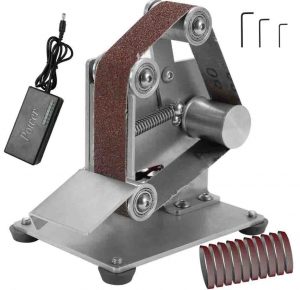
My advice here is KKmoon multifunctional machine for DIY projects. This little machine works well with what it was designed for – simple sanding and grinding tasks. It is small enough for limited work space. The sander hasn’t tracking feature to keep a strop centered, so this is not the device for knife making. But KKmoon has multiple speeds and reversible belt direction.
Small belt sander: my recommendation
Many of my colleagues think their sanders are too heavy, but I think that is an asset. I just let the weight of the machine work for me instead of bearing down on the sander. So the weight and balance are essential.
The tool needs to be heavy enough to just concentrate on guiding the sander and not pushing it down. Excessive pressure only overloads the paper and causes excessive heat. The balance is critical to make equal pressure all over the contact area. If the weight isn’t centered over the pad, the sander want to dig in in the heavy side and leave tracks.
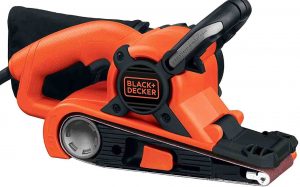
I like Black+Decker handheld belt sanders because they are generally well balanced, have some weight, and hold up pretty well. Of course, with such a small machine you can not sand a whole room or outside of your house without pauses. In general, small sanders are tools for small jobs. Read the manual, adjust the track of the belt with a small knob so it does not swing out of track. The sander is handy and small, the dust bag collects only a fraction of the dust unless you buy the optional part and connect the machine to a shop vac.
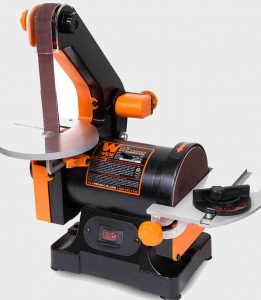
Best benchtop belt sander
Good benchtop belt sander will not be cheap. It should have the proper power and SFPM to back it up. Cheap devices from HF usually severely lacking in both. They also are going to be pretty wimpy. If you need to make Harbor Freight sander acceptable, do some “tuning”, which requires a lathe.
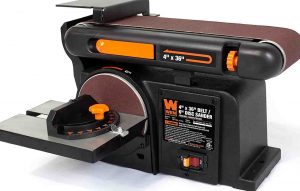
My advice is to pay a little more and buy the WEN you are talking about and Its motor and the body are very good. They are built quite well and the only things lacking are the disk sanding table and angle slide thingy.
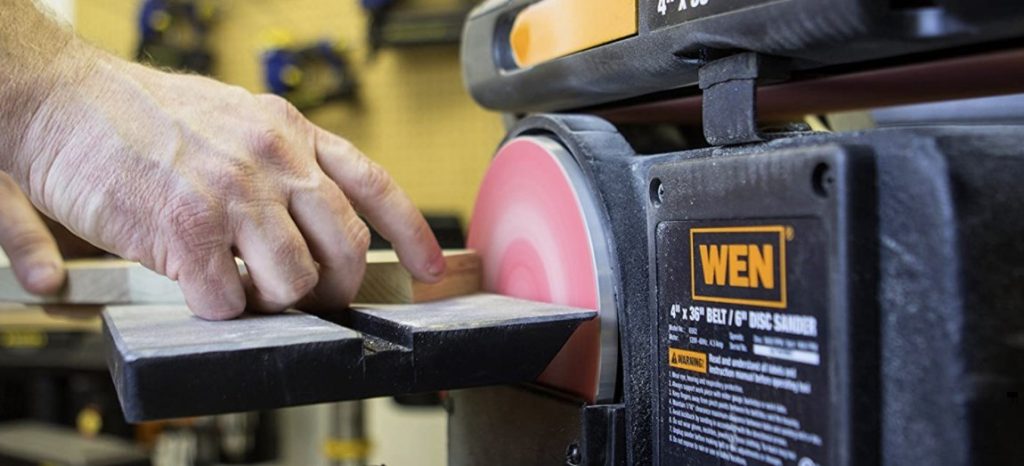
But despite that WEN owner get more than paid for in my opinion. The tool tracks the belt very well and the disc sander turn wood to dust so quick that you should be careful. Common use of WEN benchtop belt/disk sander is in woodworking. I think, you would buy it again if needed a second one.
You just can’t overload this device. It can stop, trip the breaker, but always able to get back up and running. Get the model with the cast iron base – a steel model work too, but the extra mass in the iron helps to stabilize sander and make it steady.
Yes, the miter gauge is darn near useless and taped labels are not precise. But it works, it’s making your work much easier and faster. The only probability to replace it with a note powerful version if you’ll need to use it 8 hours a day. If you only need it occasionally and for relatively light work, you’ll likely never need anything better.
Kalamazoo S4 – good even used
If you plan to use sander often, but budget is a big concern, a high quality used machines is likely your best bet. For example a Kalamazoo S4 belt sander is well suited for light fab work. While it is not true industrial grade unit, the sander will outperform anything available from the box stores.
Best belt sander for deck
Floor sanding is a pretty time-consuming task for both DIY and experts the same. If you are planning to sand floors for a living you will need to invest in a best belt sander for deck.
Belt sander for deck is a big and expensive machine, the best way to find “your” tool is to rent a few different machines to see what you really like. However, the professionals in sanding floors are typically using devices that are quite different from those you may find in the rental yards.
I usually do one or to refinishes a year as part of remodeling and get the best results with a buffer. This tool flattens the floor much better than anything else I’ve used, including the sanders used by the last two floor finishing outfits we’ve used.
In addition to an edger I really like the Porter-Cable 6″ psa orbital sander that resembles a small angle grinder. The type of pad and larger orbit flatten areas much better, and remove twice as much material as a typical RPS, yet can be slowed down for a light touch.
My advice is to do some research, talk to a floor vendor that has everything you will need, try to find some courses or at least professional to demonstrate how each machine works, and rent before you jump in. This is an expensive tool.
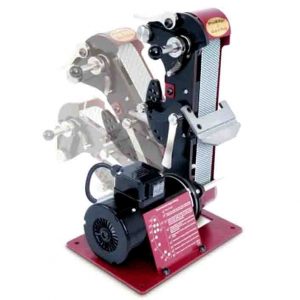
Best belt sander for woodworking
I think, 3×21 or 4×24 belt sander by good brand is more than adequate tool for light duty woodworking tasks. They are easy to get a flat smooth surface. It is great if the sander come with a holder that allows it to be used in a stationary position on it’s side. Sometimes it is convenient to lock the device into a vice so that the bottom is facing up. This position is great for edges and sharpening hatchets and axes.
Makita makes great sanders, I think, it is certainly the market leader in belt sanders. In my opinion the Makita blows the Ryobi into the weeds, it is in a different league. I’ve tried 400m/min belt speed Ryobi and Makita 9403 works much better and faster. I saved about 3hrs of working time on sanding the components of a bog stock modular two bay oak frame. And the specs says that Makita has a belt speed of 500m/min.
The main difference between a 4 x 24 and 3 x 21 is your arm won’t fall off sanding edges. If you work all day long, you really only want to be using 4 x 24 sanders on the flat.
On the other hand the 3 x 21 is the most versatile if the tool will live in a truck and will be used for installations.
And I’d avoid no-name sanding belts, they often refuse to track properly and sometimes have thick joints bumping all the time. Most of my sanding I do with P40 – P120 grits. Anything finer than P120 on a belt sander in my opinion doesn’t make any sense, the random orbit sander is more appropriate in fine tasks.
P40 and P60 work good in grinding steps in joints, high spots on floors, etc. P60 to P80 are widely used for paint removal. P100 to P120 are common for medium quality sanding.
Best belt sander knife sharpener
Best belt sander for beginner knife making – WEN 6515T 1×30″
If you have already made your first knife, chances are that you made it with a cheap and simple bench grinder and it was a very bad experience 🙂 Lots of knifemaking guys start with a 1×30″. Working with a 1-inch belt takes much longer, more belts are used, and machines usually have problems with bending and bending of the structural elements. So, in knife making the problem with cheap sanders is that they work, and makes it harder to buy a better tool.
Therefore, if you really want to buy 1×30″ sander, combine it with a hand filing jig. You will need you buy many belts with a 1×30″ grinding steel. They work but are better used for finish polishing on steel and handles.
In my opinion, the best belt sander-knife sharpener is a Sorby ProEdge plus sharpening system. These devices are designed for sharpening tools, but I also use it for sharpening knives, removing machining marks and grinding lathe tools. The only disadvantage is a the small size. The belt is 2″ wide and pretty high price (around $490 – for occasional use it maybe a bit spendy). But it’s a very good machine. Its design and build quality are in a different league from DIY type tools. The tool is made of good quality materials. Its tool rest is rock solid and repeatedly adjustable, the motor is powerful and reliable. These facts, as well as the speed of the belt (very good for steel) make it the best belt sander for knife making.
Conclusions
Small and cheap belt sanders are strictly speaking for DIY use. However, passionate DIYers sooner or later replace all of their most commonly used “DIY” tools for more professional models because always find the DIY machines inadequate. Nevertheless, you cannot always predict whether you will like the device. If it turns out to be not so necessary in your practice, then a cheap and compact sander will not be superfluous.
Pro tools are expensive and tend to be both designed for use by competent users and accurate. You really need good and expensive device when working with floors, knifemaking etc.
 If you have a lot of custom bends and cuts, rebar bender is a GREAT tool. One of my project included bending about 500 braces with 2-3 bends each. I can’t imagine how I’d made this task so quick and accurate without my manual rebar bending machine. Since that time I have had many other bends, and it was so much easier with the tool than with a homemade jig.
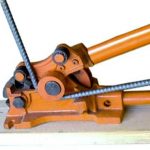
 Chain mortiser is a unique tool helping you to do framing quick and effective. It saves more than enough time and efforts to justify its cost of use. Of course, you always can make frame mortises with chisel and drilling work, but your shoulder and wrist joints won’t thank you, especially when you are getting older. Nobody of my professional woodworkers regret buying the chain mortiser. They also use it any time that they need to hog out material – dovetails, sides of tenons, mortises, etc.
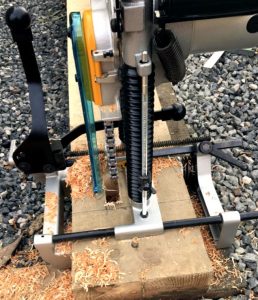

 Do you want to do the work a normal hammer and chisel can do faster and easier? The electric chisel will help you to perform a pretty smooth, controllable and continuous carving with perfect depth and direction control. Moreover, you can find many chisel profiles for a decent price and change your chisel blade at the click of a button. Intrigued? Read our article to find out more!
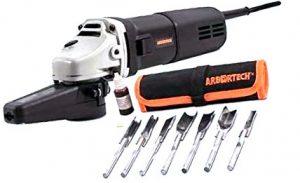


![Best Table Saw for Beginners: Tips for Beginner Woodworker [2021]](https://bestdrillbit.com/wp-content/uploads/2021/05/best-table-saw-for-beginners-1-1200x713.jpg)


![Scroll Saw vs Band Saw Review and Comparison [2021]](https://bestdrillbit.com/wp-content/uploads/2021/05/scroll-saw-vs-band-saw.jpg)


 For small projects you can just clamp miter saw to a workstation, but cutting miters into lengthy trim pieces needs a real stand. Most of woodworkers don’t really want a bunch of bell and whistles, best miter saw stand should be as light as possible an at the same time sturdy and reliable. The unit will definitely be transported back and forth, so it should not be weak and fragile. However, the stand is not a tool that you will use 24/7, so it shouldn’t cost you an arm and a leg either. Read our article to make an informed decision and purchase the best tool. Any and all suggestions and comments are welcome and appreciated.

 Long time ago I bought both belt and sheet sanders. The sheet device was replaced few times, but the belt one worked flawlessly. And finally, when my 20 year old belt sander (it seems to be Skill) gave up, I was wondering should I replace it with a small and cheap device or something better and may be heavier. I will share here some thoughts and the results of my search for the best belt sander on the market.