Dull bits start smoking in wood, they are heating and just don’t drill effectively. Dull bit won’t cut clean, and overheating causes fractures and material breakage. There are many gadgets out there for sharpening drill bits. But you can sharpen ones by hand.
Sequential sharpening
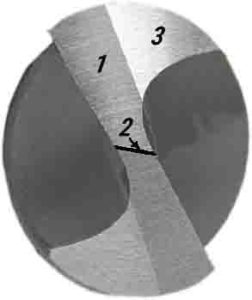
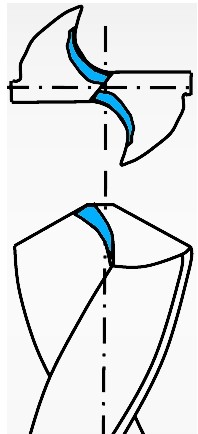
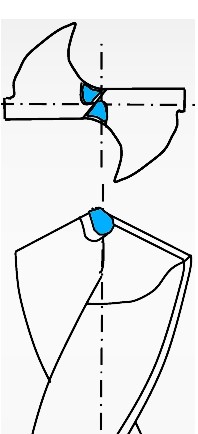
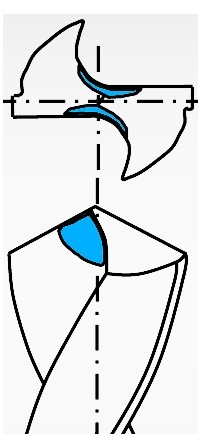
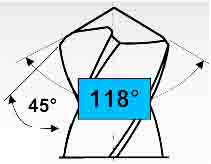
118° Four Facet. 1 – General purpose point, 2 – web, 3 – Secondary clearance 4 – Cutting edge
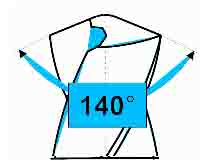
You need to process back surface at first. This should be done carefully, in several stages. Press the drill firmly to the grinding wheel surface. Pay attention to the sharpening angle (see below), it should be unchanged.
Next stage is sharpening of the cutting edge. You should maintain the angle. Form the web of the drill carefully (web forming). It’s size should not exceed 0.4 mm (0.016 in) for drill bit diameters about 8 mm (5/16 in) or less. The size of larger drill bits’ web can be in the range from 1 to 0.5mm (0.02-0.04 in).
The conical sharpening
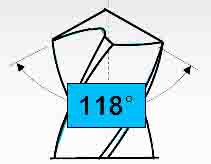
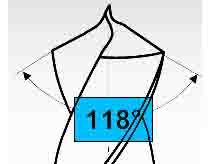
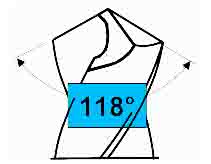
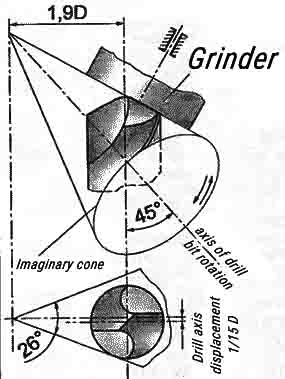 Drills with a 1/8″ diameter and larger are usually sharpened with a conical sharpening method. Such a sharpening is easy to perform on the conventional machine with a grinding wheel. The end edge of the drill bit pressed to grinding surface at an angle of 118° or another.
Imagine a cone in which the side directed along the cutting edge, as well as the grinding wheel. The vertex is placed as shown at the picture. In this case, the angle at the tip should be equal to 26°. Drill bit’s axis should intersect with the axis of the imaginary cone at an angle of approximately 45°. If you start to rotate the bit around the axis of the cone, on the rear face will be formed a conical surface. In order to form a right back angle, it is necessary to place the drill axis at about 1/15D relative to the axis of the imaginary cone.
The larger the offset value, the greater will be the back corner. This type of sharpening is a little difficult, but quite effective. To properly perform a conical grinding, you need to take the drill bit in a left hand as close as possible to the cone, and hold the tail of the drill in a right hand. Press the cutting edge of the drill bit and start smooth movement of the right hand so that a rear surface is pressed against the wheel, and gradually becomes conical. Repeat the process with the second drill side.
If it is too complex for you, you can sharpen the cutting edge and then lift the drill bit tip up to 10-15° to form a back surface (youtube guide from machiningmoments)
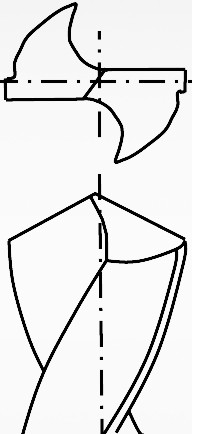
Web Thinning
Drill webs are non-cutting part of the bit, they don’t contribute to the cutting process, but consume power and torque when move through the work piece. You should reduce it’s length to be as short as possible in length!
With no thinning, received from the manufacture web looks like this
Conventional thinning – stock is removed to follow the flute contour
Split Point – cutting edges meet almost at the center

Notched point helps centering and reducing of radial force
Flatting the face of the flute eliminates “hogging-in”

Gash Type – Grinding two half-round gashes near the center of the drill
Drill Point Angles
General purpose
Chamfer (to reduce burr)
Helical Point (self centering)
For soft and ductile material

Split (reduce thrust & self centering -NC)
High alloyed steels